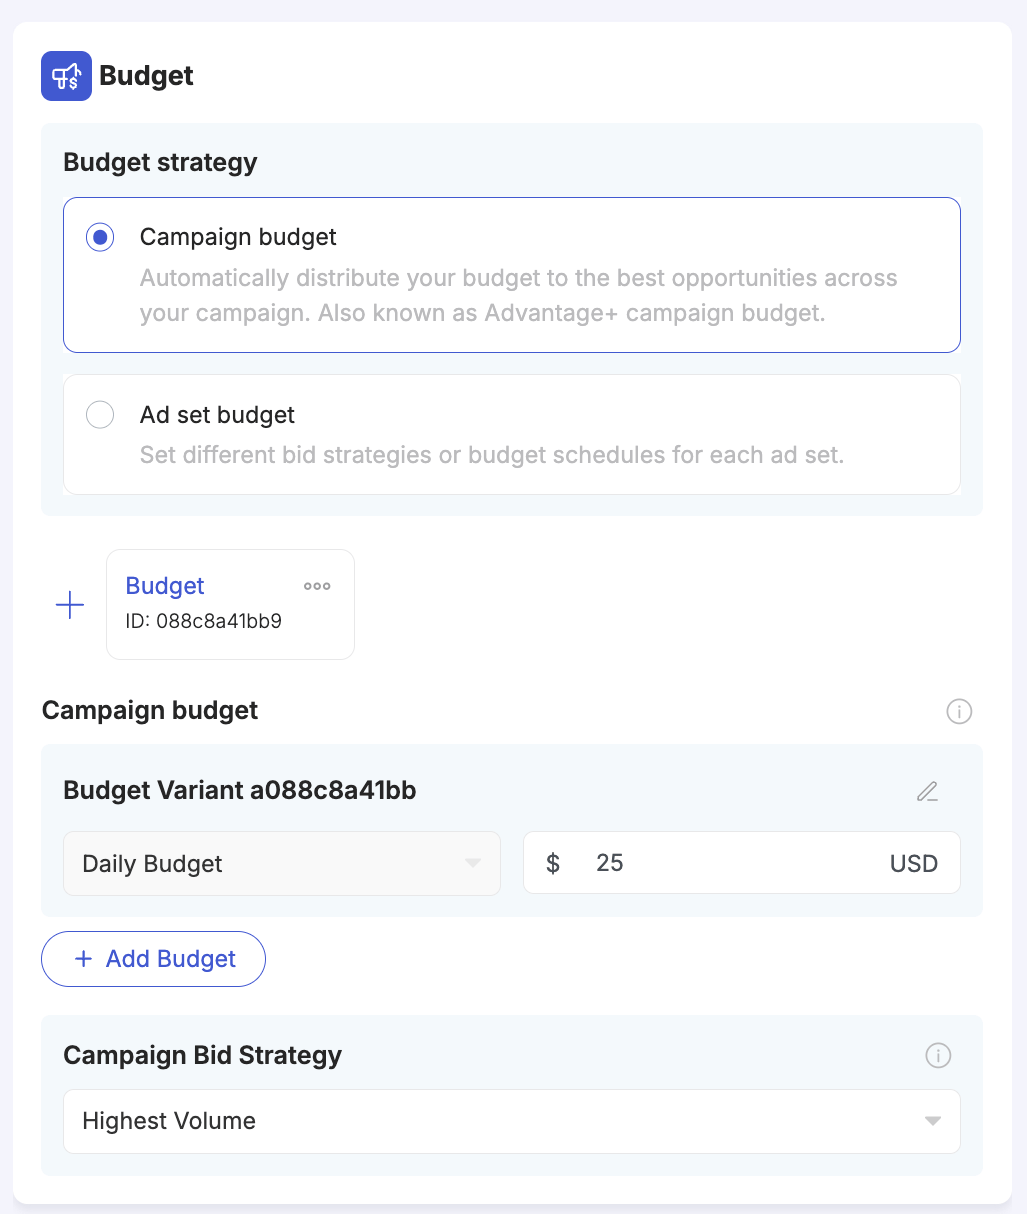
 **Budget Strategy — choose one:**
* **Campaign budget** (Advantage+ Campaign Budget) — Facebook automatically distributes the total budget across your ad sets, allocating more to the best-performing ones. This is the recommended option for most use cases.
* **Ad set budget** — each ad set gets its own independent budget, which you configure individually at the ad set level. Use this when you need strict budget control per ad set.
**Budget Variants** — if Campaign budget is selected, the budget amount is set here via Budget Variants. Each group card represents a separate budget variation. Click **+ Add Budget** within a group to add multiple budget amounts to the same group if needed. When you add more Budget groups (by clicking **+** next to the group cards), each group generates a separate campaign variation — one campaign per budget.
**Campaign Bid Strategy** — controls how Facebook bids for your ads:
| Strategy | How it works |
| ------------------------ | ------------------------------------------------------------------------------ |
| **Highest Volume** | Spends the full budget to get as many results as possible |
| **Cost Per Result Goal** | Targets a specific average cost per result (soft cap — Facebook may exceed it) |
| **Bid Cap** | Sets a maximum bid per auction (hard cap — stricter delivery constraints) |
| **ROAS Goal** | Targets a minimum return on ad spend |
***
## Ad Set Level
Click on the Ad Set in the left panel tree and configure the following:
| Field | Description |
| ------------------------ | --------------------------------------------------------------------------------------------------------------------- |
| **Ad Set Name** | A name for the ad set, or use a naming template |
| **Conversions Location** | Website, App, Website and App, or Calls |
| **Performance Goal** | For example, Maximize Number of Conversions or Maximize Value of Conversions |
| **Pixel** | The Facebook pixel to use for optimisation |
| **Conversion Event** | The conversion event to optimise toward |
| **Beneficiary** | Enter the beneficiary for ad transparency. If left blank, TheOptimizer uses the default from your ad account settings |
***
### Budget & Schedule
**Budget Strategy — choose one:**
* **Campaign budget** (Advantage+ Campaign Budget) — Facebook automatically distributes the total budget across your ad sets, allocating more to the best-performing ones. This is the recommended option for most use cases.
* **Ad set budget** — each ad set gets its own independent budget, which you configure individually at the ad set level. Use this when you need strict budget control per ad set.
**Budget Variants** — if Campaign budget is selected, the budget amount is set here via Budget Variants. Each group card represents a separate budget variation. Click **+ Add Budget** within a group to add multiple budget amounts to the same group if needed. When you add more Budget groups (by clicking **+** next to the group cards), each group generates a separate campaign variation — one campaign per budget.
**Campaign Bid Strategy** — controls how Facebook bids for your ads:
| Strategy | How it works |
| ------------------------ | ------------------------------------------------------------------------------ |
| **Highest Volume** | Spends the full budget to get as many results as possible |
| **Cost Per Result Goal** | Targets a specific average cost per result (soft cap — Facebook may exceed it) |
| **Bid Cap** | Sets a maximum bid per auction (hard cap — stricter delivery constraints) |
| **ROAS Goal** | Targets a minimum return on ad spend |
***
## Ad Set Level
Click on the Ad Set in the left panel tree and configure the following:
| Field | Description |
| ------------------------ | --------------------------------------------------------------------------------------------------------------------- |
| **Ad Set Name** | A name for the ad set, or use a naming template |
| **Conversions Location** | Website, App, Website and App, or Calls |
| **Performance Goal** | For example, Maximize Number of Conversions or Maximize Value of Conversions |
| **Pixel** | The Facebook pixel to use for optimisation |
| **Conversion Event** | The conversion event to optimise toward |
| **Beneficiary** | Enter the beneficiary for ad transparency. If left blank, TheOptimizer uses the default from your ad account settings |
***
### Budget & Schedule
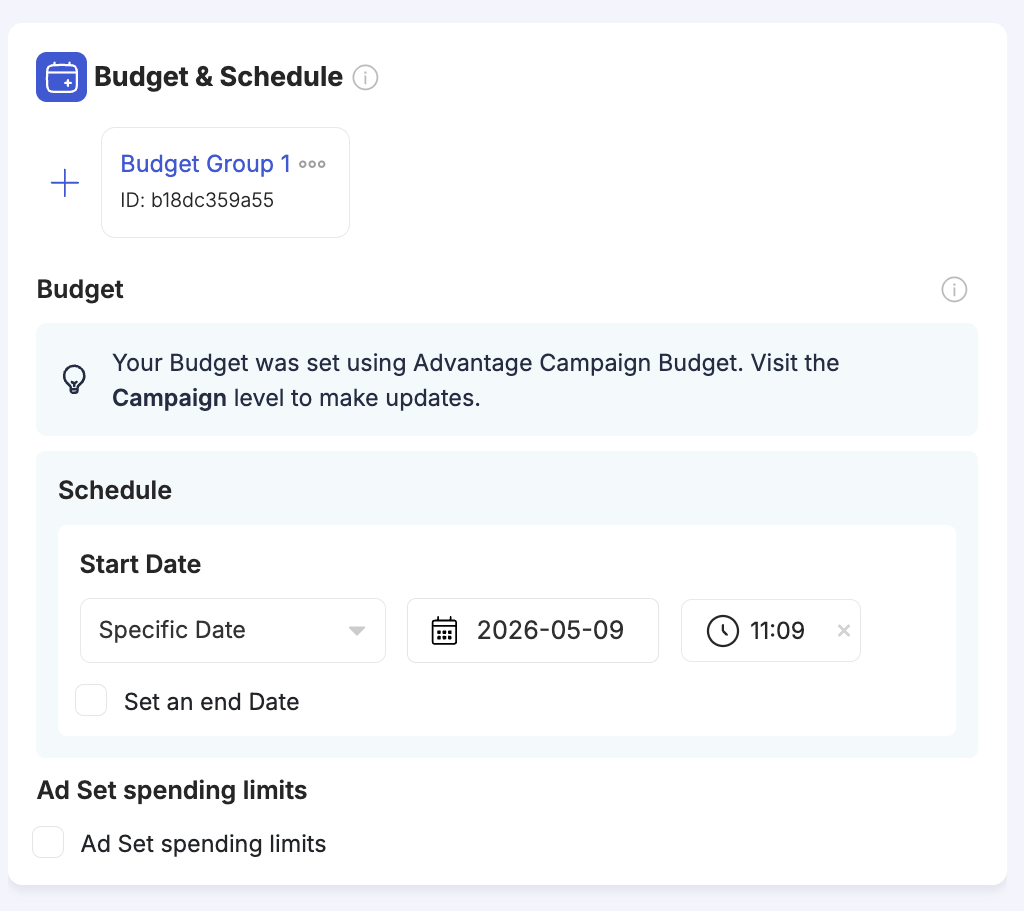 **Budget** — if you selected **Ad set budget** at the campaign level, the per-ad-set budget is configured here. If you selected Campaign budget (Advantage+), the budget section at the ad set level shows an informational note and is not editable — return to the campaign level to change it.
**Schedule:**
| Option | Description |
| ------------------- | ------------------------------------------------------------------------------------------------------------------------------- |
| **Start Date** | Choose **Specific Date** to set an exact date and time for the ad set to go live, or leave it to start immediately upon publish |
| **Set an end Date** | Optionally tick this checkbox to define when the ad set should stop running |
**Ad Set spending limits** — tick this checkbox to set a maximum and/or minimum amount Facebook can spend on this ad set over its lifetime, regardless of the campaign budget. Useful when using Advantage Campaign Budget and you want to protect or guarantee spend for specific ad sets.
**Budget** — if you selected **Ad set budget** at the campaign level, the per-ad-set budget is configured here. If you selected Campaign budget (Advantage+), the budget section at the ad set level shows an informational note and is not editable — return to the campaign level to change it.
**Schedule:**
| Option | Description |
| ------------------- | ------------------------------------------------------------------------------------------------------------------------------- |
| **Start Date** | Choose **Specific Date** to set an exact date and time for the ad set to go live, or leave it to start immediately upon publish |
| **Set an end Date** | Optionally tick this checkbox to define when the ad set should stop running |
**Ad Set spending limits** — tick this checkbox to set a maximum and/or minimum amount Facebook can spend on this ad set over its lifetime, regardless of the campaign budget. Useful when using Advantage Campaign Budget and you want to protect or guarantee spend for specific ad sets.
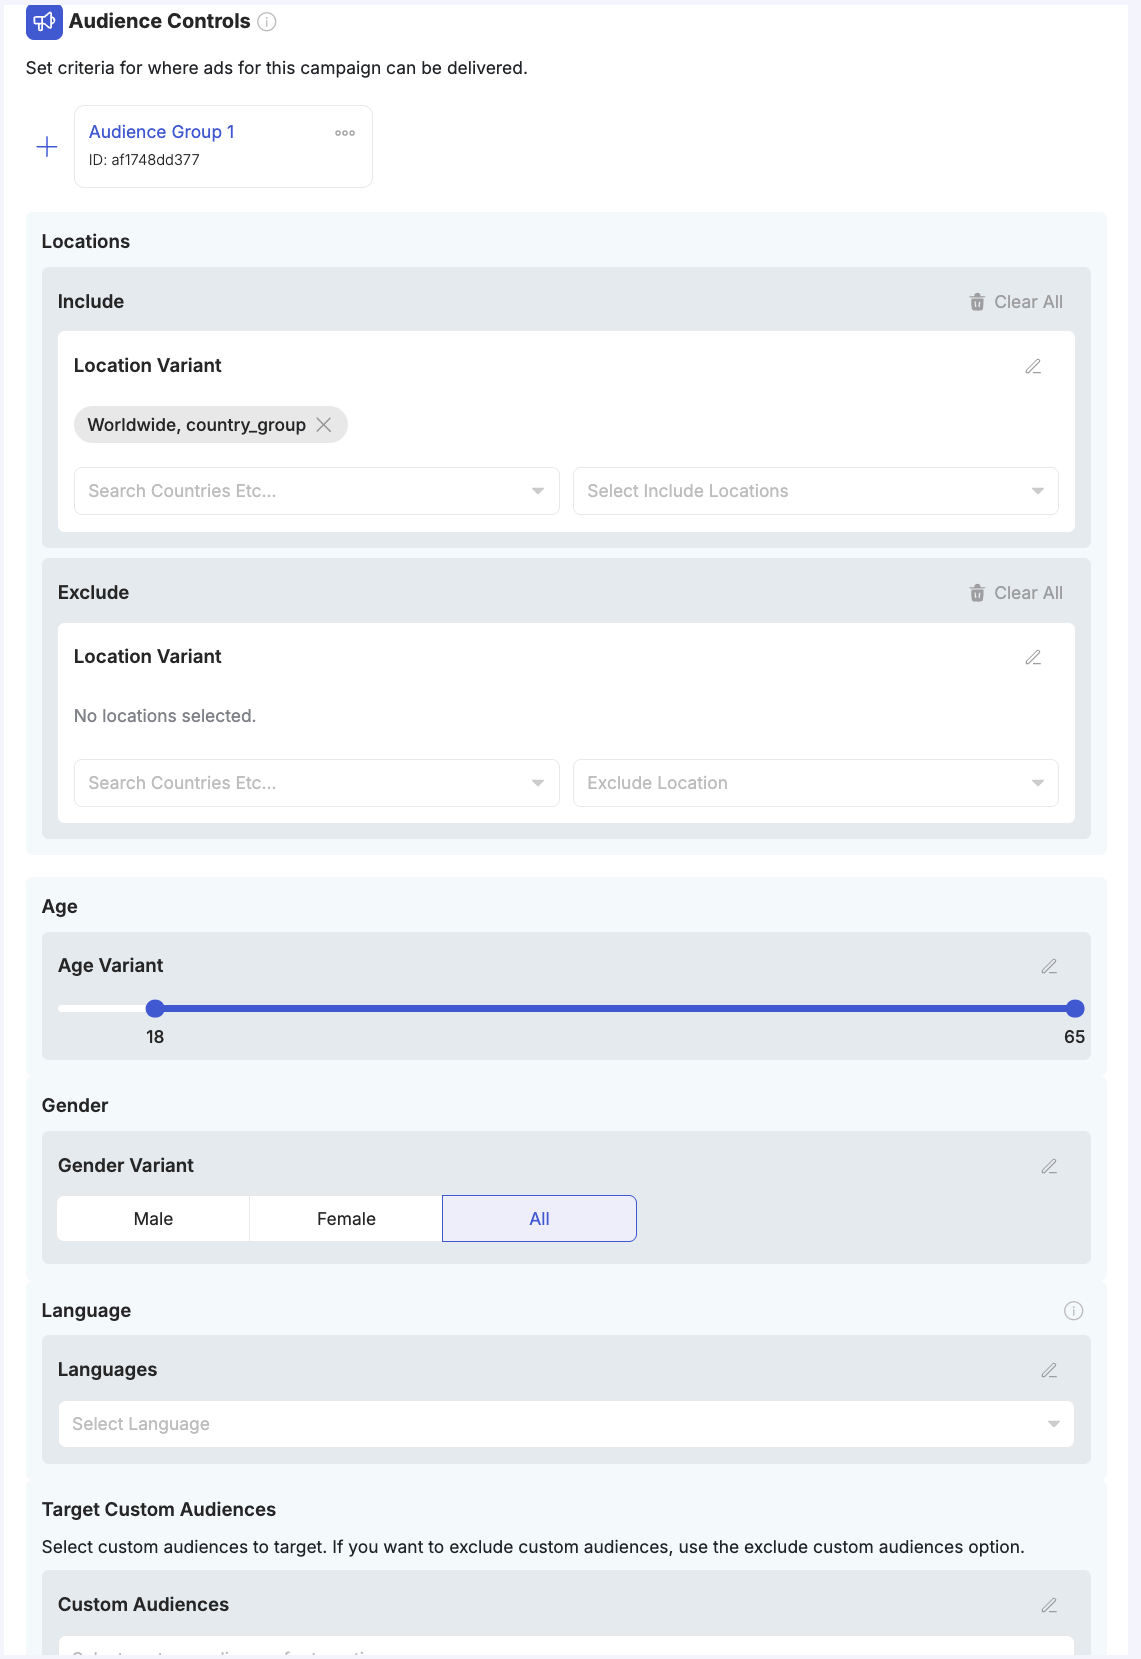 The Audience Controls section defines who sees your ads. Each audience group card at the top represents a separate audience variation — add more groups by clicking **+**.
**Locations:**
* **Include** — add countries, regions, cities, or postal codes. Use the **Location Variant** field to apply a location preset (e.g., "Worldwide, country\_group" to target all countries at once) or search and select specific locations.
* **Exclude** — remove specific locations from your targeting. Useful for blocking countries where you are not set up to take orders, or removing existing customer locations from a prospecting campaign.
**Age** — drag the Age Variant slider to set your minimum and maximum target age (18–65+).
**Gender** — select Male, Female, or All.
**Language** — optionally restrict delivery to users whose Facebook language matches a specific language. Leave empty to target all languages.
**Target Custom Audiences** — select previously created Custom Audiences from Facebook to include or exclude. Typical uses: retargeting website visitors, targeting existing customer lists, or excluding current customers from prospecting campaigns.
The Audience Controls section defines who sees your ads. Each audience group card at the top represents a separate audience variation — add more groups by clicking **+**.
**Locations:**
* **Include** — add countries, regions, cities, or postal codes. Use the **Location Variant** field to apply a location preset (e.g., "Worldwide, country\_group" to target all countries at once) or search and select specific locations.
* **Exclude** — remove specific locations from your targeting. Useful for blocking countries where you are not set up to take orders, or removing existing customer locations from a prospecting campaign.
**Age** — drag the Age Variant slider to set your minimum and maximum target age (18–65+).
**Gender** — select Male, Female, or All.
**Language** — optionally restrict delivery to users whose Facebook language matches a specific language. Leave empty to target all languages.
**Target Custom Audiences** — select previously created Custom Audiences from Facebook to include or exclude. Typical uses: retargeting website visitors, targeting existing customer lists, or excluding current customers from prospecting campaigns.
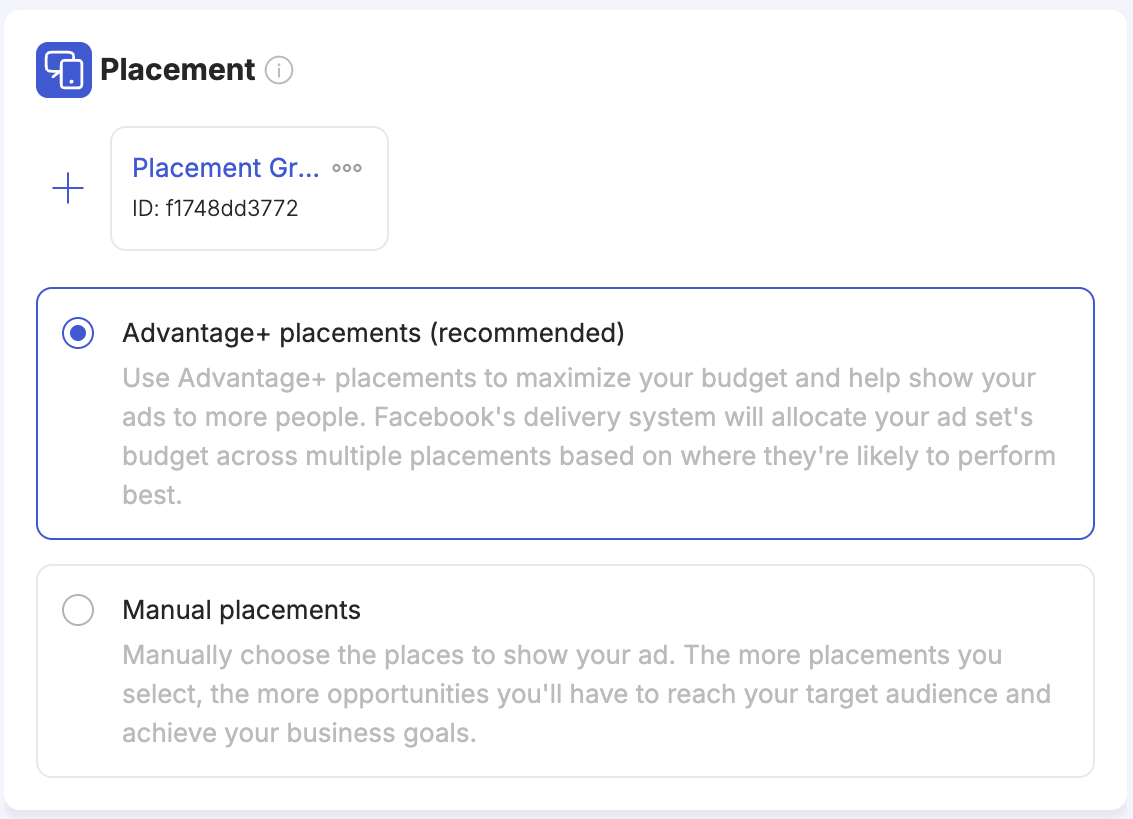 Each placement group card represents a separate placement variation — add more groups with **+** to test different placement configurations against each other.
| Option | Description |
| --------------------------------------- | ----------------------------------------------------------------------------------------------------------------------------------------------------------------------------------------------------------------------------------------------------------------------- |
| **Advantage+ placements** (recommended) | Facebook's delivery system automatically allocates your budget across all eligible placements — Feed, Stories, Reels, Audience Network, Messenger, etc. — based on where your ads are likely to perform best. Typically delivers the best cost efficiency. |
| **Manual placements** | You choose exactly which platforms (Facebook, Instagram, Audience Network, Messenger) and positions (Feed, Stories, Reels, In-stream, etc.) to run on. Use this when you have a specific reason to exclude certain placements or want to isolate placement performance. |
***
## Ad Level
Click on the ad in the left panel tree and configure the following:
***
### Identity
Each placement group card represents a separate placement variation — add more groups with **+** to test different placement configurations against each other.
| Option | Description |
| --------------------------------------- | ----------------------------------------------------------------------------------------------------------------------------------------------------------------------------------------------------------------------------------------------------------------------- |
| **Advantage+ placements** (recommended) | Facebook's delivery system automatically allocates your budget across all eligible placements — Feed, Stories, Reels, Audience Network, Messenger, etc. — based on where your ads are likely to perform best. Typically delivers the best cost efficiency. |
| **Manual placements** | You choose exactly which platforms (Facebook, Instagram, Audience Network, Messenger) and positions (Feed, Stories, Reels, In-stream, etc.) to run on. Use this when you have a specific reason to exclude certain placements or want to isolate placement performance. |
***
## Ad Level
Click on the ad in the left panel tree and configure the following:
***
### Identity
 | Field | Description |
| --------------------- | ------------------------------------------------------------------------------------------------------------------------------------------------------------------------------------------------------------------------------ |
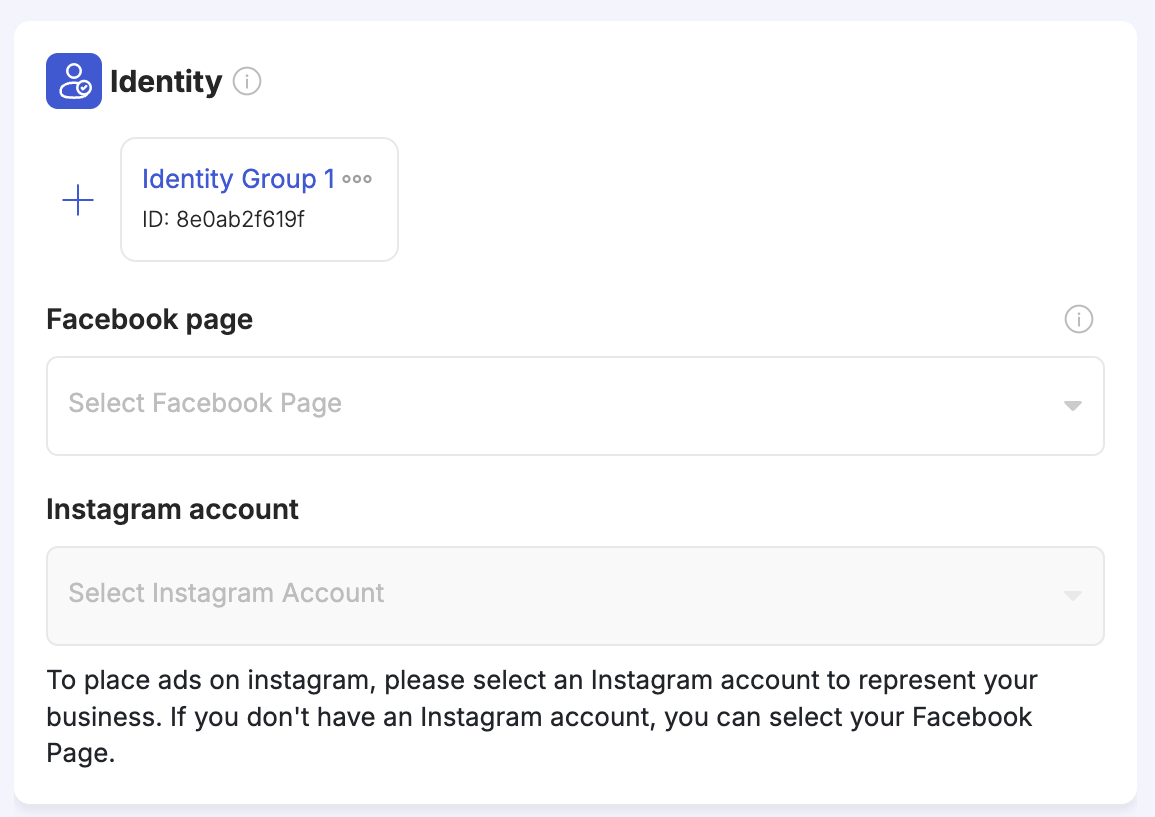
| **Facebook page** | The Facebook Page your ad will appear to come from. Required for all ads. |
| **Instagram account** | The Instagram account your ad will be associated with when running on Instagram placements. If you do not have an Instagram account, select your Facebook Page — Facebook will use it to represent your business on Instagram. |
Each identity group card represents a separate Identity variation — add more groups with **+** to test running the same ads from different Pages or Instagram accounts. This is useful for agencies managing multiple brands, or for testing how audience perception varies by Page identity.
***
### Ad Creative
| Field | Description |
| --------------------- | ------------------------------------------------------------------------------------------------------------------------------------------------------------------------------------------------------------------------------ |
| **Facebook page** | The Facebook Page your ad will appear to come from. Required for all ads. |
| **Instagram account** | The Instagram account your ad will be associated with when running on Instagram placements. If you do not have an Instagram account, select your Facebook Page — Facebook will use it to represent your business on Instagram. |
Each identity group card represents a separate Identity variation — add more groups with **+** to test running the same ads from different Pages or Instagram accounts. This is useful for agencies managing multiple brands, or for testing how audience perception varies by Page identity.
***
### Ad Creative
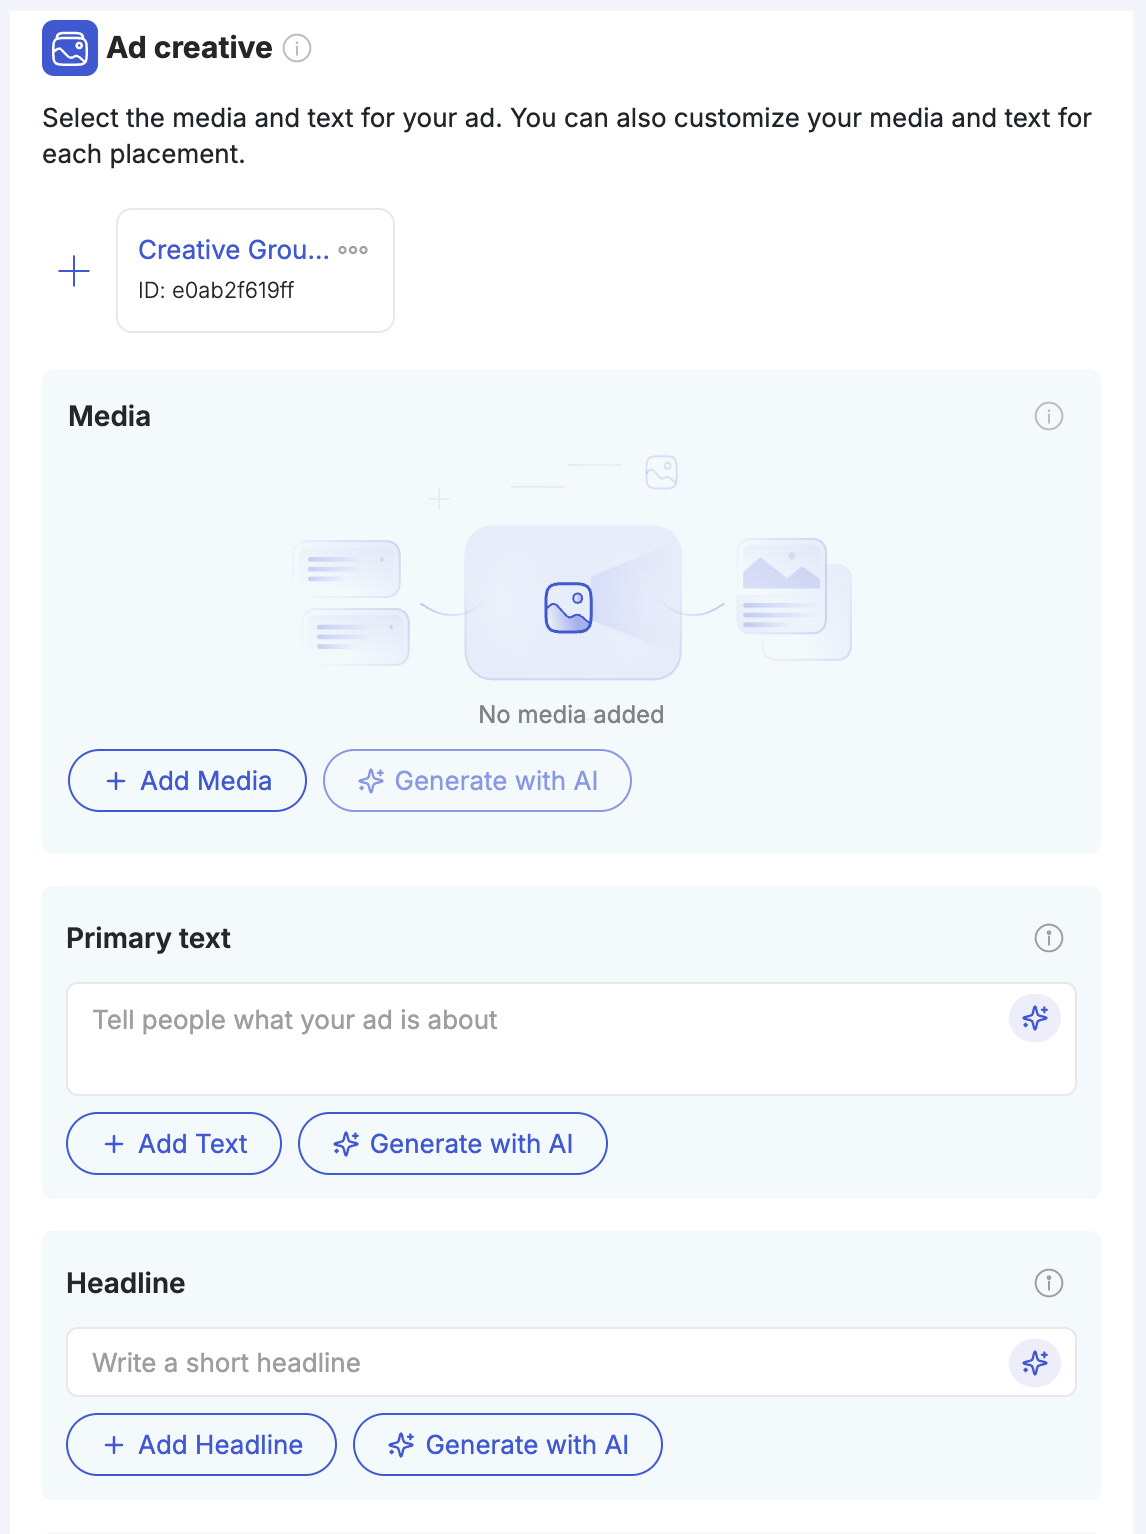 **Ad Name and Format:**
| Field | Description |
| ------------- | --------------------------------------------------- |
| **Ad Name** | A name for the ad, or use a naming template |
| **Status** | Active or Paused |
| **Ad Format** | Single Image or Video, Catalog Ads, or Flexible Ads |
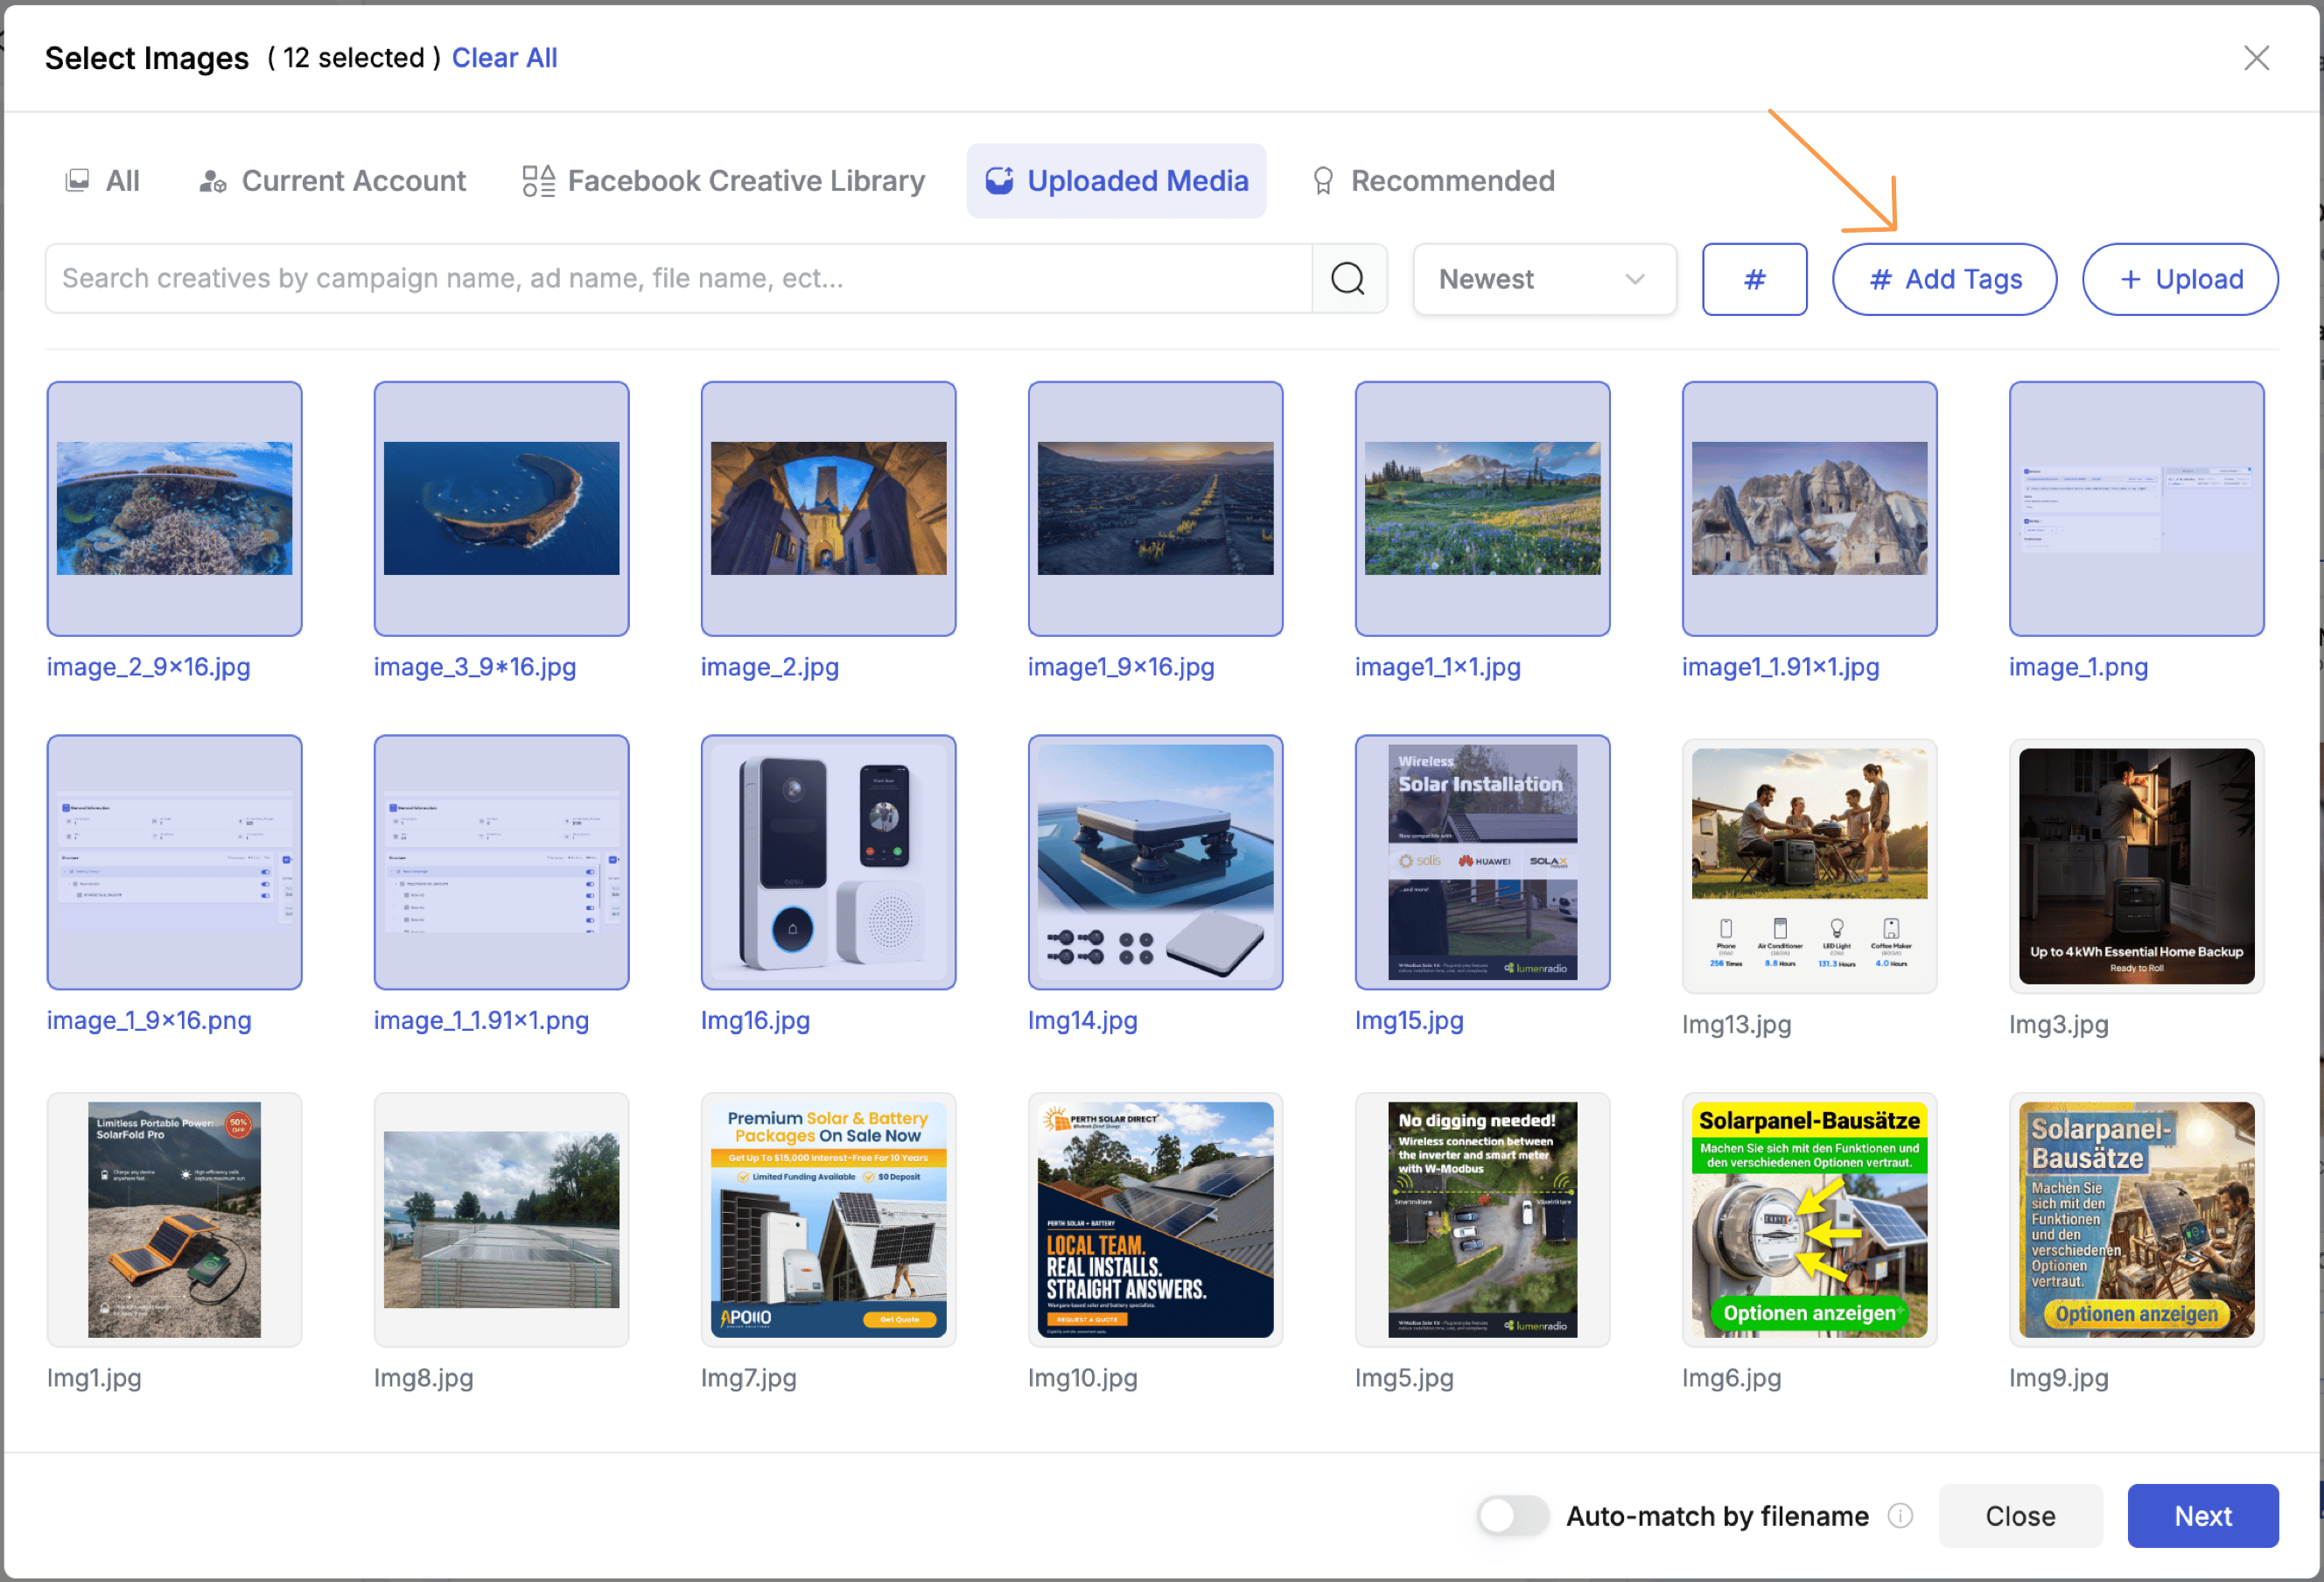
**Media** — click **+ Add Media** to open the media browser where you can:
* **Browse existing creatives** — TheOptimizer displays all images and videos from your active campaigns across all connected Facebook accounts. Sort by newest, oldest, highest spend, highest EPC, most used, or least used. Filter by Creative Library tags.
* **Upload new media** — click **Upload** to add new images or videos directly.
* **Generate with AI** — click **✨ Generate with AI** to create new image variations using an AI prompt or example images. Useful for quickly producing creative variants without leaving the launcher.
Each uploaded image or video generates one ad. If you upload five images, five ads are created — the count updates immediately in the **Variation Preview** panel.
**Per-creative options:**
* **Enhance with AI** — generate a new version of any image by providing a prompt or example images.
* **Customize by Placement** — assign a different image for specific placements (for example, a different crop for Instagram Stories). You can do this per image, or use **Bulk Placement Customization** at the bottom of the media section to apply placement overrides across all ads at once.
**Ad copy:**
| Field | Notes |
| ------------------ | ------------------------------------------------------------------------------------------------------------------------------------- |
| **Primary Text** | The main body copy. Click **+ Add Text** to add one or more variations, or **✨ Generate with AI** to generate copy based on a prompt. |
| **Headline** | Short headline below the media. Click **+ Add Headline** to add variations, or **✨ Generate with AI** to generate options. |
| **Description** | Optional additional text. Add one or more variations. |
| **Call to Action** | Select from available options (Learn More, Shop Now, etc.) |
**Destination:**
| Field | Notes |
| ------------------- | ------------------------------------------------ |
| **Destination URL** | The landing page for the ad |
| **Pixel** | The tracking pixel for this ad |
| **URL Parameters** | Add tracking parameters for third-party trackers |
**Ad Name and Format:**
| Field | Description |
| ------------- | --------------------------------------------------- |
| **Ad Name** | A name for the ad, or use a naming template |
| **Status** | Active or Paused |
| **Ad Format** | Single Image or Video, Catalog Ads, or Flexible Ads |
**Media** — click **+ Add Media** to open the media browser where you can:
* **Browse existing creatives** — TheOptimizer displays all images and videos from your active campaigns across all connected Facebook accounts. Sort by newest, oldest, highest spend, highest EPC, most used, or least used. Filter by Creative Library tags.
* **Upload new media** — click **Upload** to add new images or videos directly.
* **Generate with AI** — click **✨ Generate with AI** to create new image variations using an AI prompt or example images. Useful for quickly producing creative variants without leaving the launcher.
Each uploaded image or video generates one ad. If you upload five images, five ads are created — the count updates immediately in the **Variation Preview** panel.
**Per-creative options:**
* **Enhance with AI** — generate a new version of any image by providing a prompt or example images.
* **Customize by Placement** — assign a different image for specific placements (for example, a different crop for Instagram Stories). You can do this per image, or use **Bulk Placement Customization** at the bottom of the media section to apply placement overrides across all ads at once.
**Ad copy:**
| Field | Notes |
| ------------------ | ------------------------------------------------------------------------------------------------------------------------------------- |
| **Primary Text** | The main body copy. Click **+ Add Text** to add one or more variations, or **✨ Generate with AI** to generate copy based on a prompt. |
| **Headline** | Short headline below the media. Click **+ Add Headline** to add variations, or **✨ Generate with AI** to generate options. |
| **Description** | Optional additional text. Add one or more variations. |
| **Call to Action** | Select from available options (Learn More, Shop Now, etc.) |
**Destination:**
| Field | Notes |
| ------------------- | ------------------------------------------------ |
| **Destination URL** | The landing page for the ad |
| **Pixel** | The tracking pixel for this ad |
| **URL Parameters** | Add tracking parameters for third-party trackers |
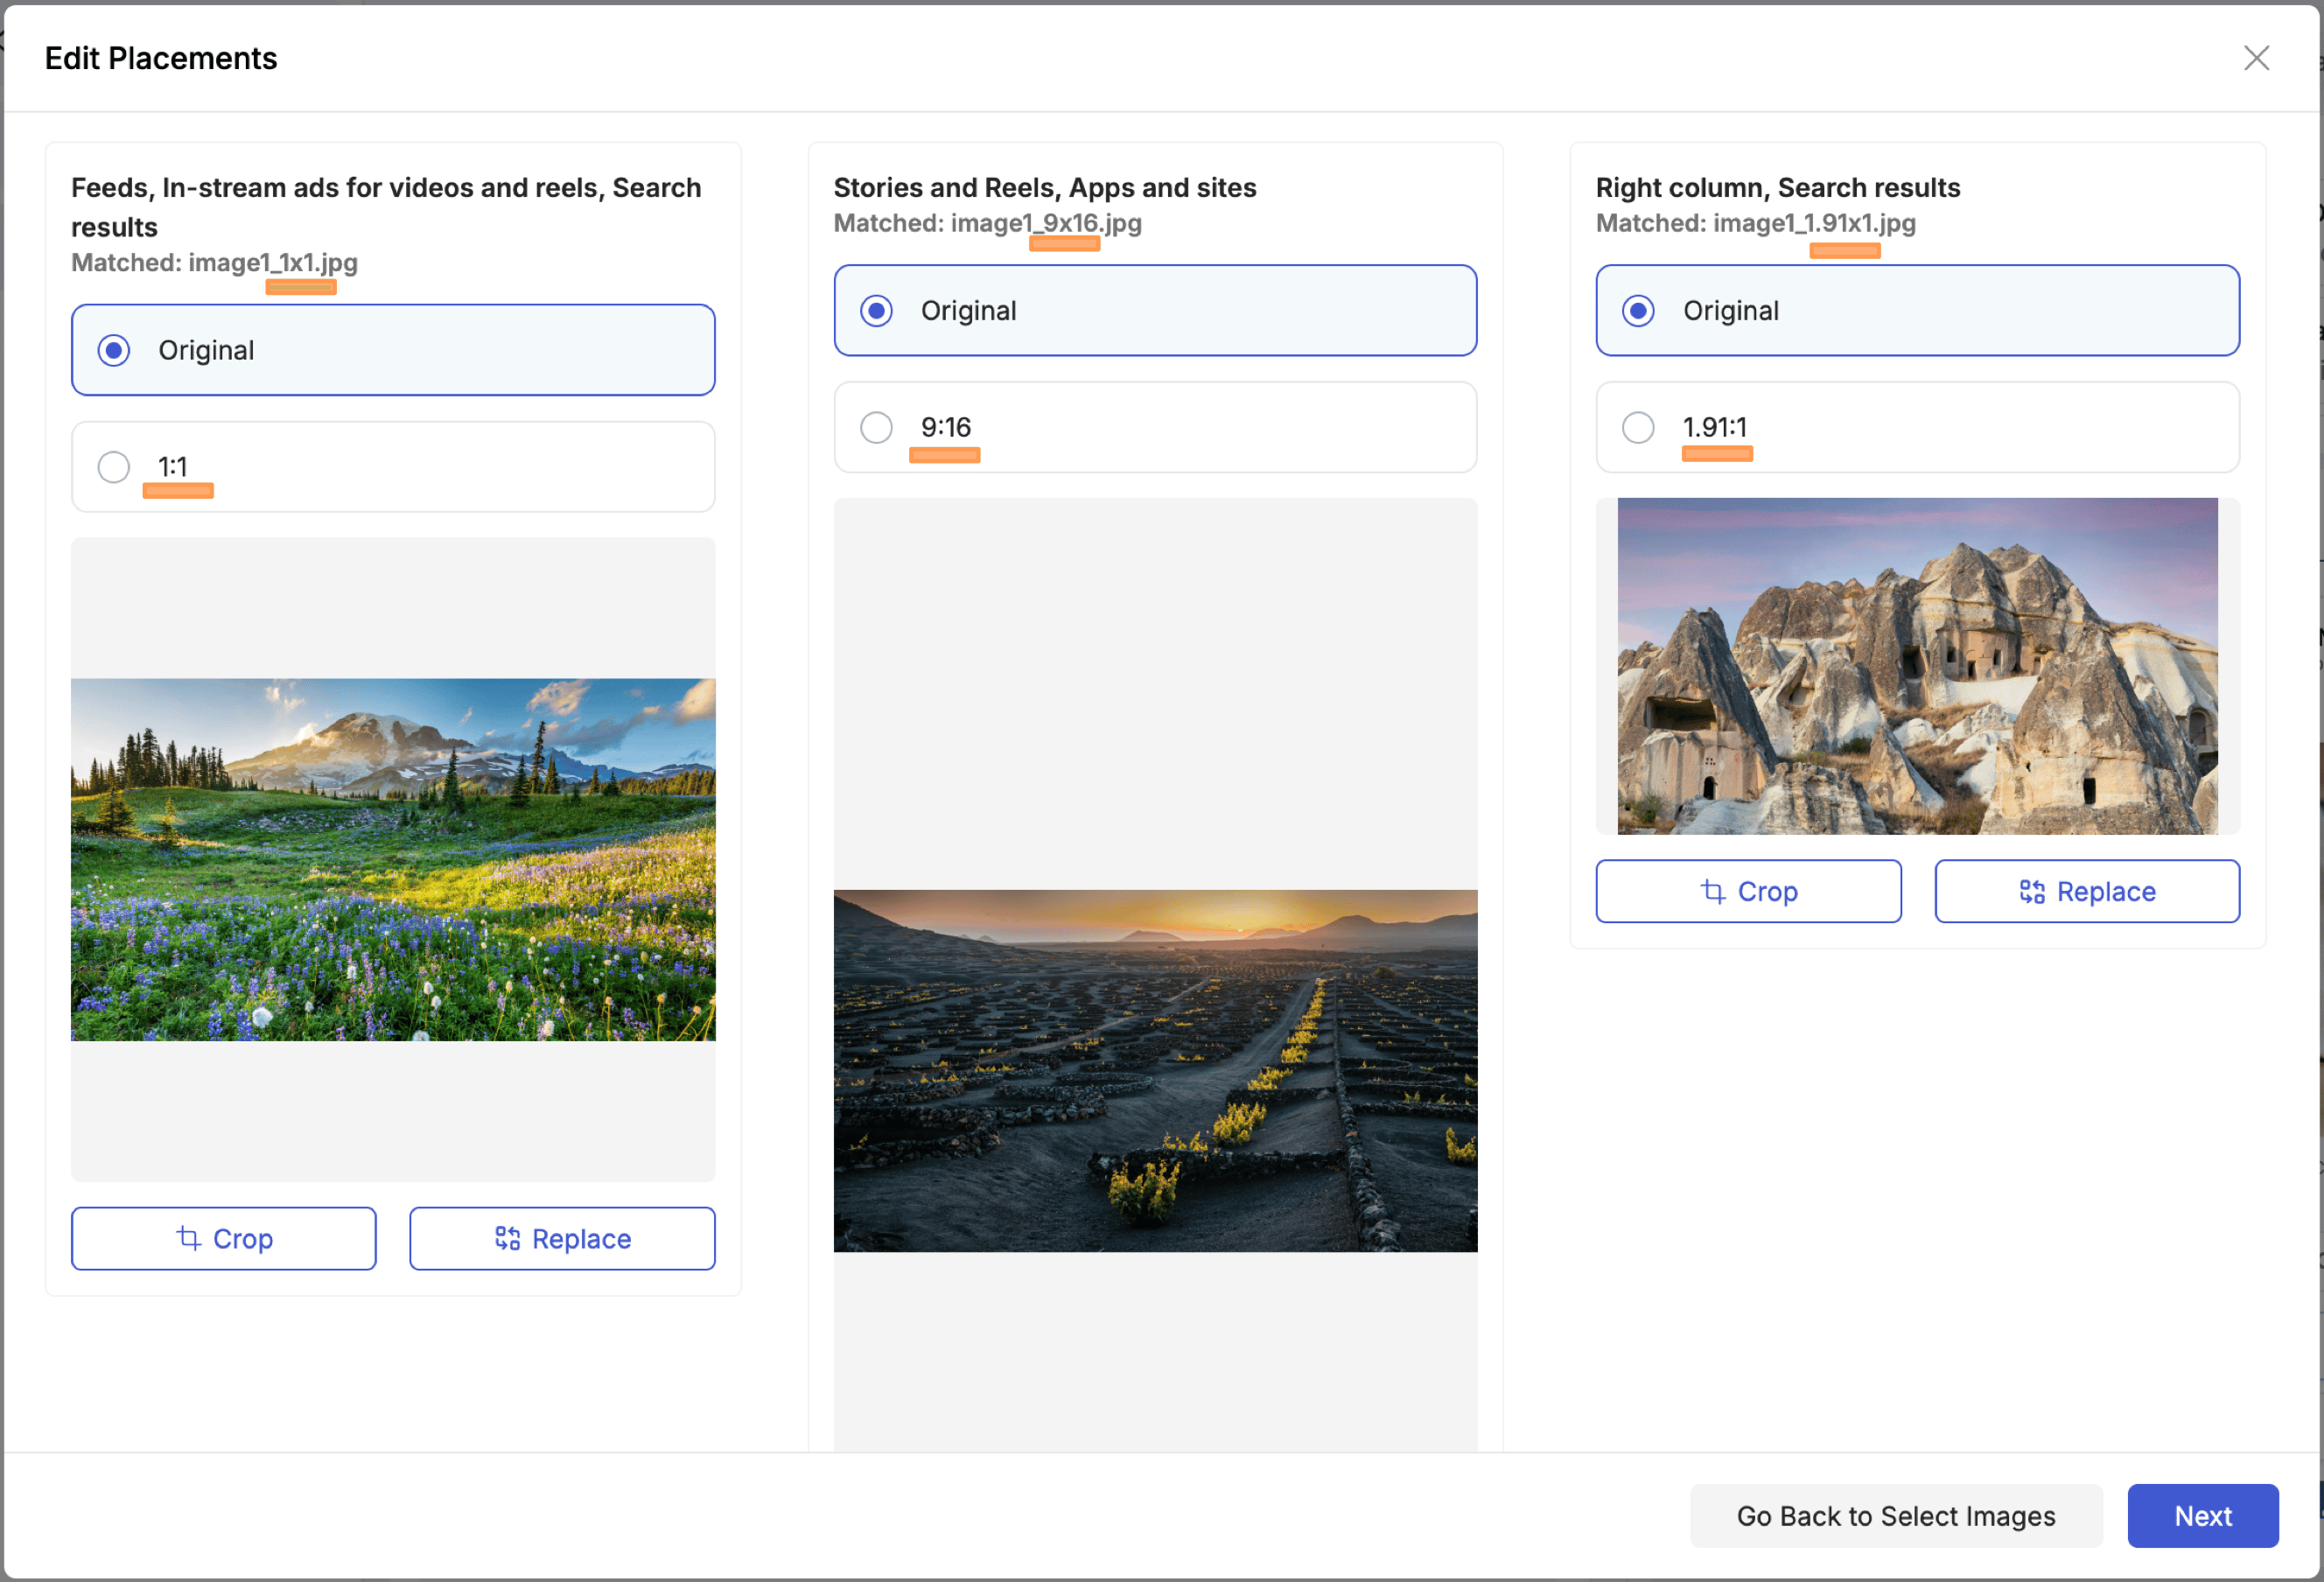
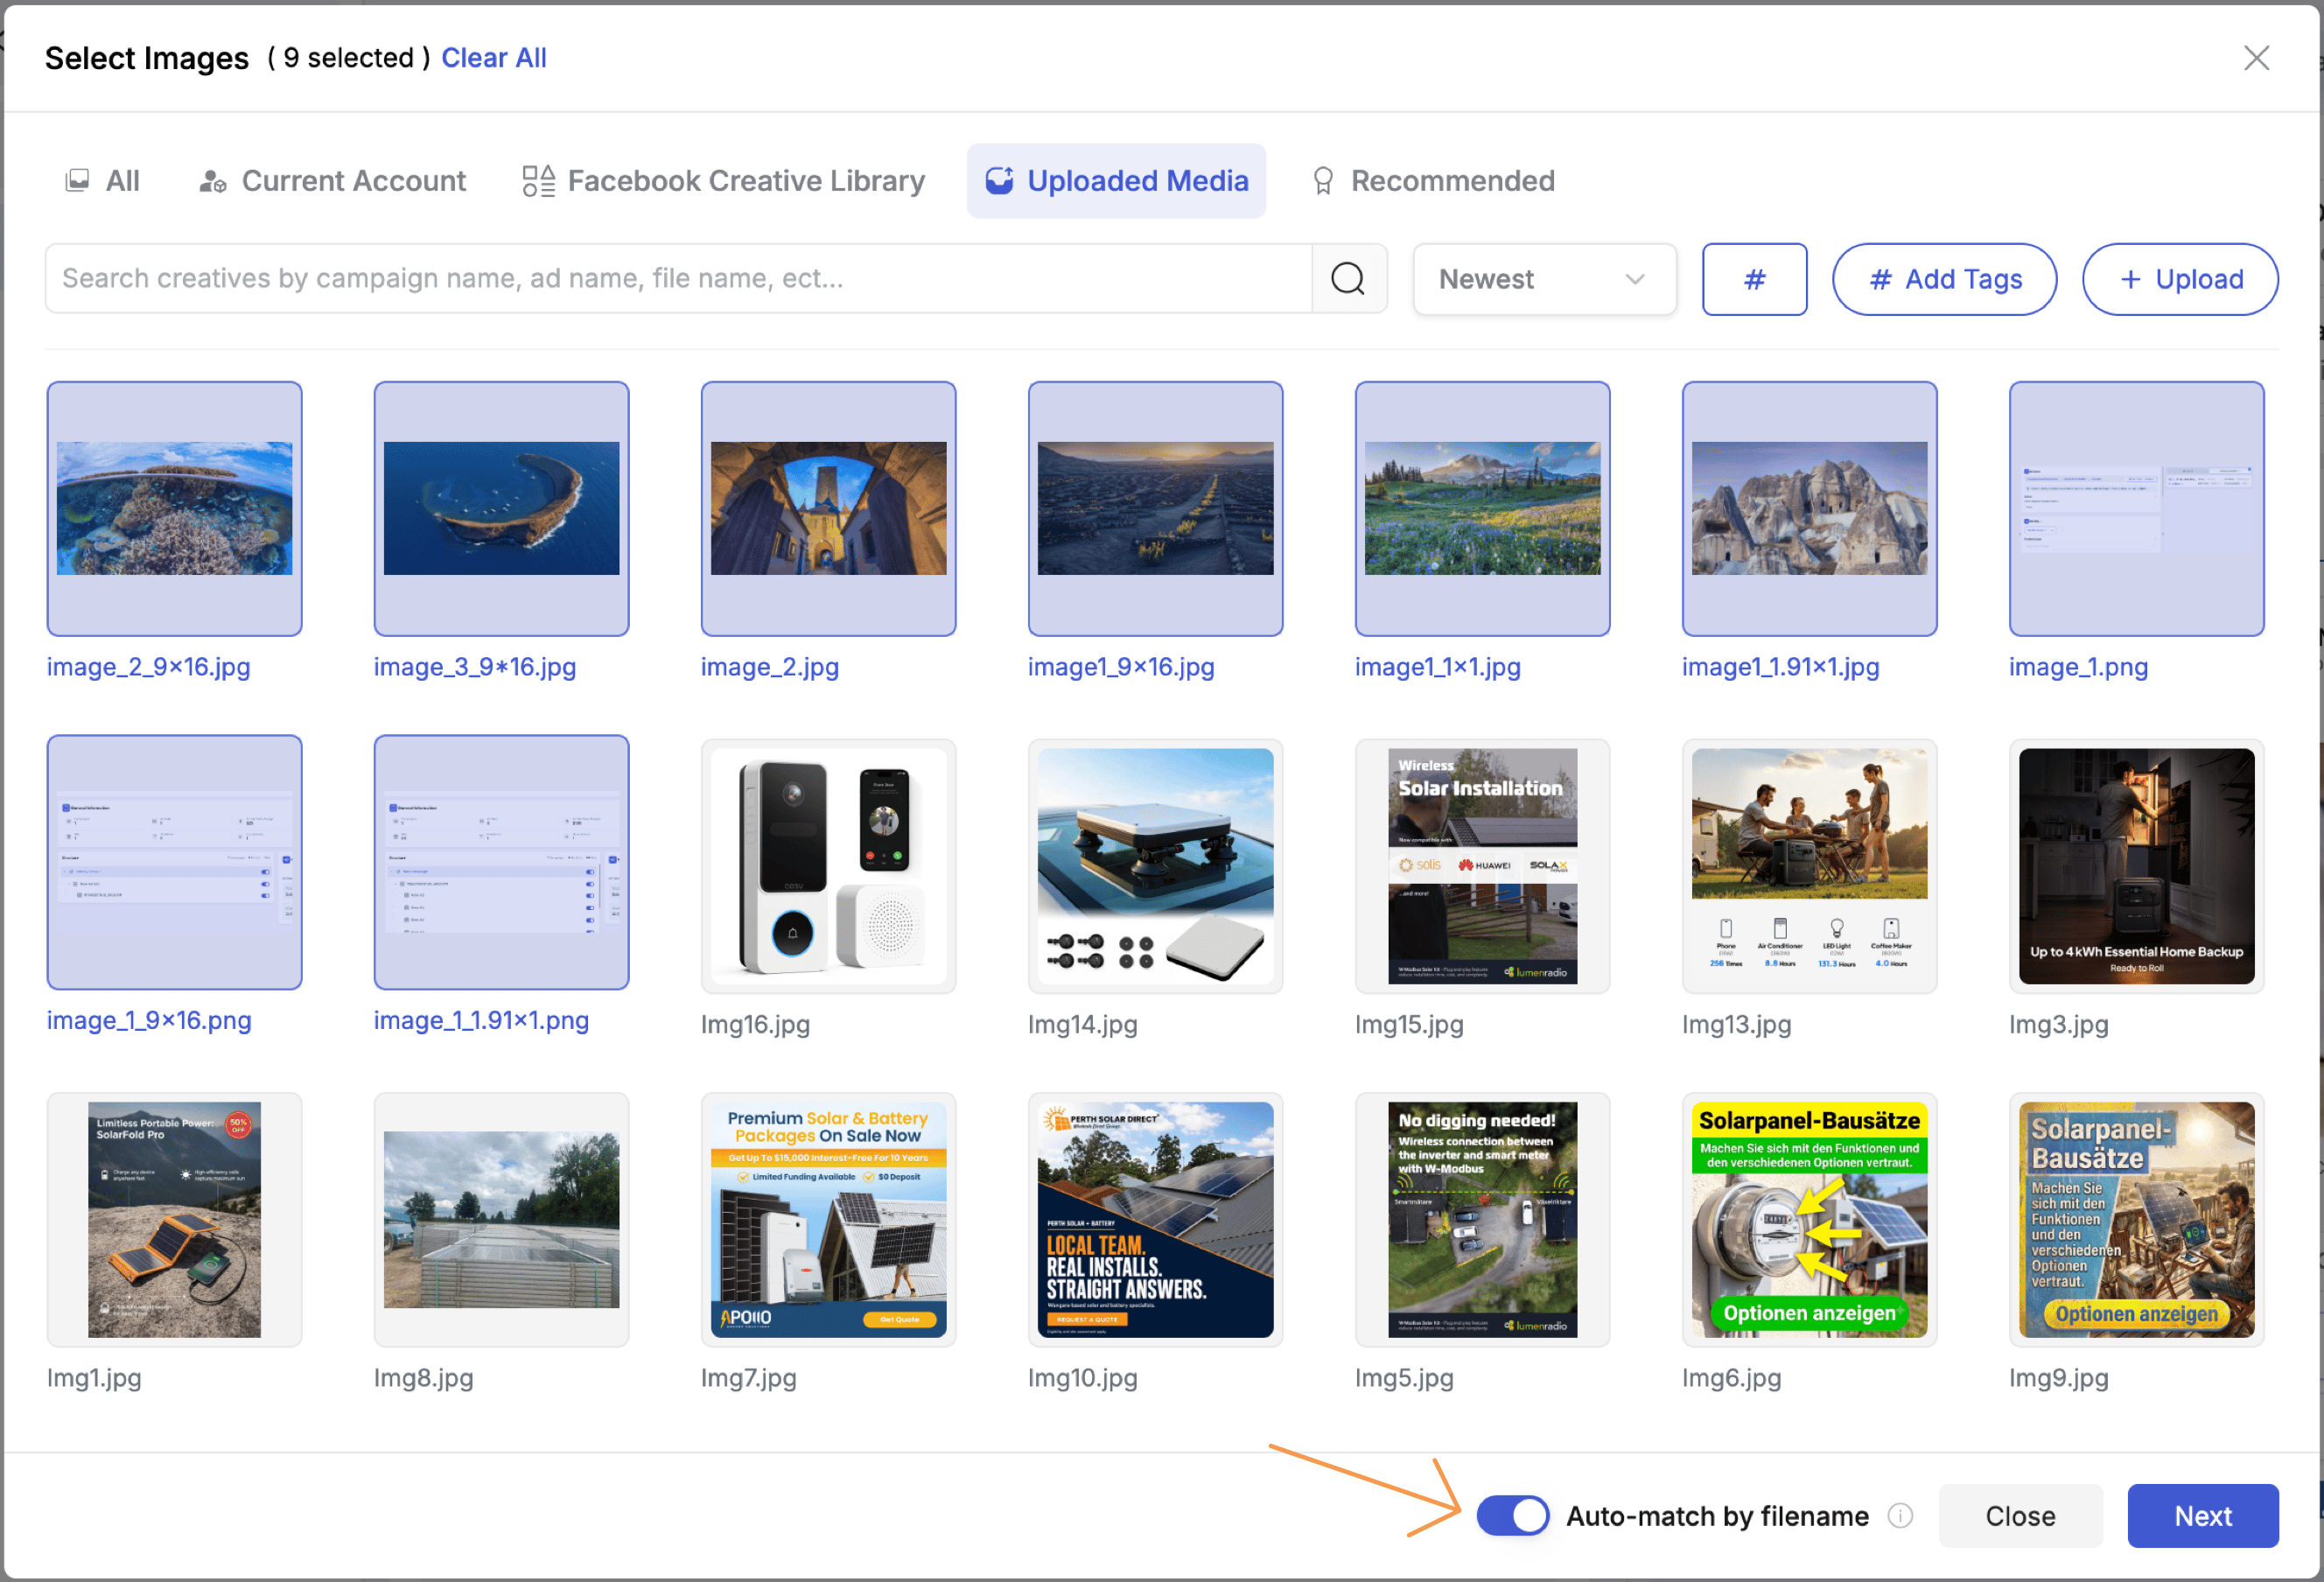 The next screen (**Edit Placements**) shows the result: each placement column already has the matching image pre-assigned, with the matched filename shown under the placement name.
 ***
### New Ad Formats: Catalog Ads and Flexible Ads
Two new ad format options are now available in the **Ad Format** selector.
**Catalog Ads** — connects the ad directly to a Facebook Product Catalog. When selected, the media section is replaced with a catalog and segment selector — choose the catalog and the product set to use. The ad dynamically pulls images, names, and prices from your catalog.
**Flexible Ads** — allows you to organise images into groups within a single ad creative. Each Creative group can contain a different set of images, and you can drag and drop images to reorder them within each group. This is useful when you want to test different image batches while keeping the same ad set structure.
***
## What Happens When You Upload Multiple Images
Every image or video you upload becomes a separate ad. If you upload 10 images, you get 10 ads. This is the simplest way to test multiple creatives — one ad per creative, all in the same ad set, sharing the same targeting and budget.
The **Variation Preview** panel on the right updates in real time as you add media. Always check the totals before moving to the next step.
***
## Next: Generate Campaign Variations
Once your base campaign is configured, you can move to [Generate Campaign Variations](/ad-networks/facebook/campaign-uploader/variations) to multiply this structure into dozens or hundreds of campaigns using Groups, Restructuring, and Duplication.
***
### New Ad Formats: Catalog Ads and Flexible Ads
Two new ad format options are now available in the **Ad Format** selector.
**Catalog Ads** — connects the ad directly to a Facebook Product Catalog. When selected, the media section is replaced with a catalog and segment selector — choose the catalog and the product set to use. The ad dynamically pulls images, names, and prices from your catalog.
**Flexible Ads** — allows you to organise images into groups within a single ad creative. Each Creative group can contain a different set of images, and you can drag and drop images to reorder them within each group. This is useful when you want to test different image batches while keeping the same ad set structure.
***
## What Happens When You Upload Multiple Images
Every image or video you upload becomes a separate ad. If you upload 10 images, you get 10 ads. This is the simplest way to test multiple creatives — one ad per creative, all in the same ad set, sharing the same targeting and budget.
The **Variation Preview** panel on the right updates in real time as you add media. Always check the totals before moving to the next step.
***
## Next: Generate Campaign Variations
Once your base campaign is configured, you can move to [Generate Campaign Variations](/ad-networks/facebook/campaign-uploader/variations) to multiply this structure into dozens or hundreds of campaigns using Groups, Restructuring, and Duplication.