> ## Documentation Index
> Fetch the complete documentation index at: https://docs.theoptimizer.io/llms.txt
> Use this file to discover all available pages before exploring further.
# Save as Template & Reuse
> Save your full campaign configuration — including groups, restructuring settings, and automation assignments — as a reusable template for future launches.
export const ArcadeVideoButton = ({id, title = "Watch interactive demo", label = "Watch Video"}) => {
const [open, setOpen] = useState(false);
return
;
};
After building a campaign structure — including all groups, Restructuring settings, multi-account copies, naming templates, and automation assignments — you can save the entire configuration as a reusable template.
***
## Saving a Template
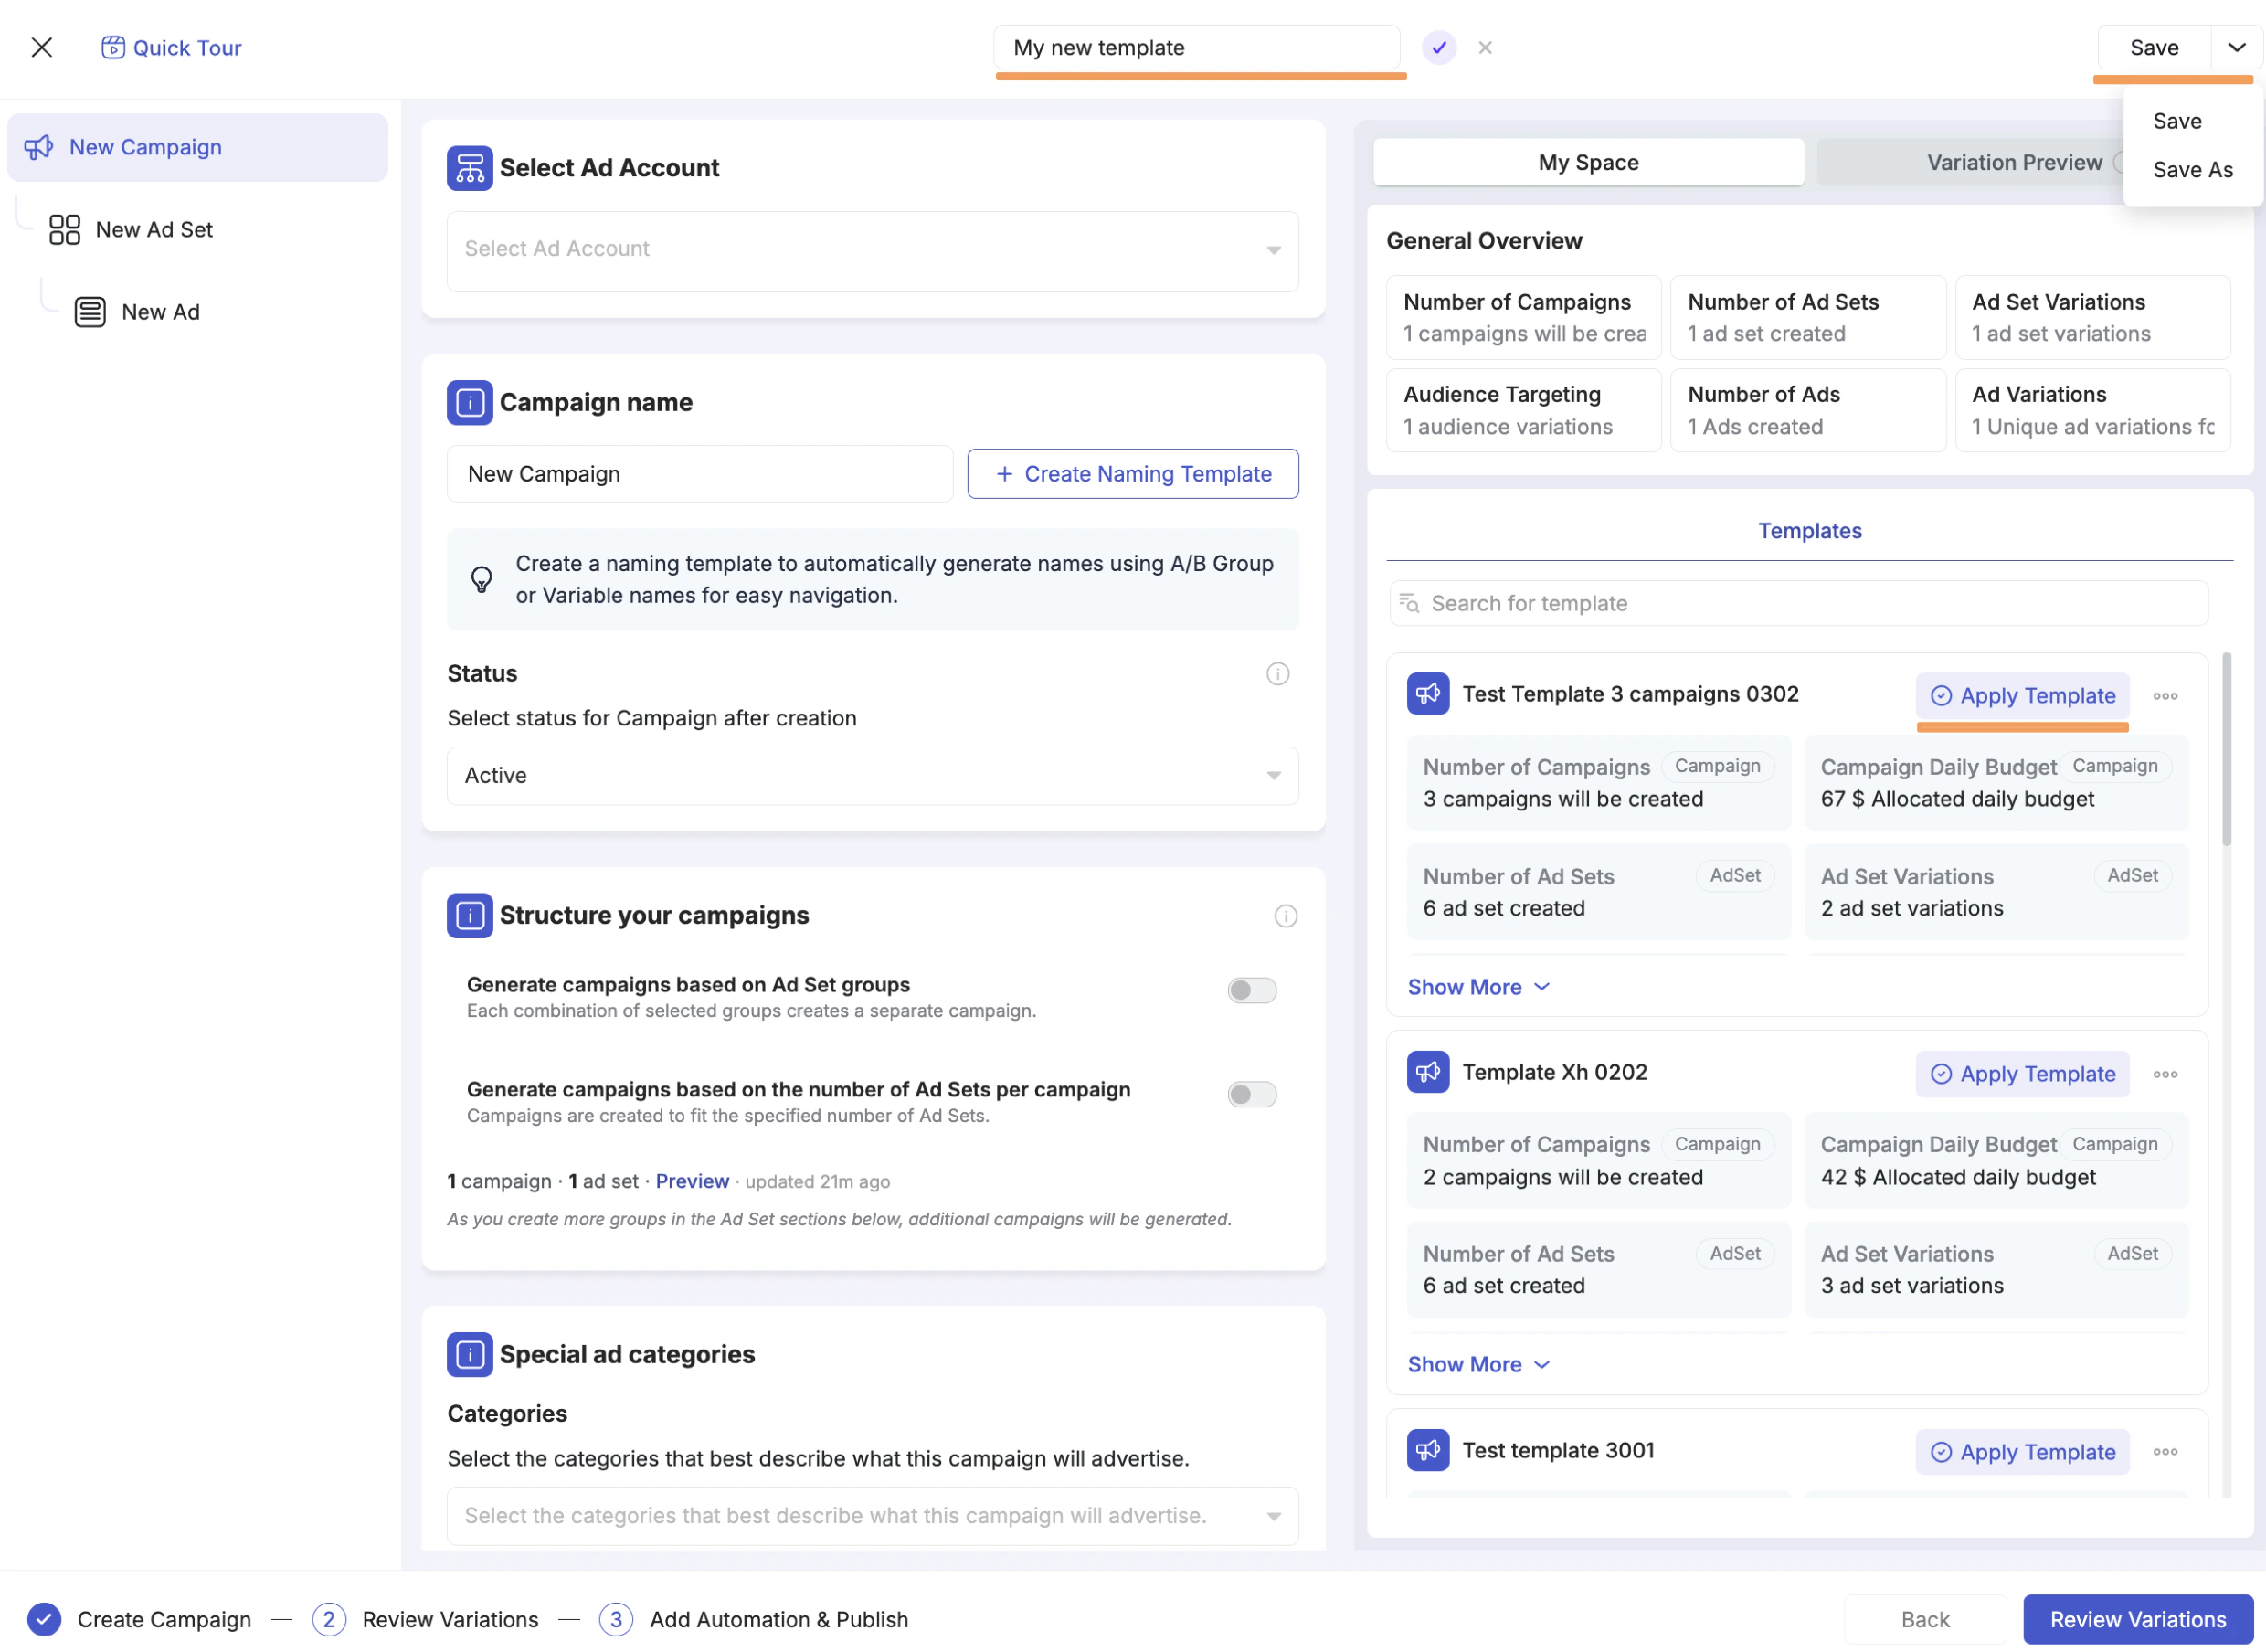
When you are ready to save, click the **Save** dropdown in the top-right corner of the launcher. Two options appear:
* **Save** — saves the current state over the existing template name (if you loaded one and want to update it), or prompts you to name a new template.
* **Save As** — always creates a new template with a new name, leaving the original unchanged. Use this when you want to create a variant of an existing template without overwriting it.
Give the template a name, confirm, and it is stored to your account.
***
## Applying a Saved Template
The next time you open the Facebook Campaign Launcher, go to the campaign level and open the **My Space** tab on the right panel. Your saved templates are listed there, each showing a summary of what the template will create:
* **Number of Campaigns** — how many campaigns will be generated
* **Campaign Daily Budget** — the total daily budget across campaigns
* **Number of Ad Sets** — total ad sets that will be created
* **Ad Set Variations** — number of ad set variations
Click **Apply Template** next to any template to instantly load the entire structure — campaign settings, ad set configuration, ad setup, groups, Restructuring rules, and automation assignments. The **Variation Preview** panel on the right also updates immediately to reflect the template's totals, so you can confirm you are loading the right structure before making any changes.
***
## Making Changes After Loading
Once a template is loaded, everything is fully editable. Typically you only need to:
* Swap in new creatives at the ad level
* Adjust a budget amount
* Update a destination URL or pixel
* Change the ad account (for multi-account launches)
The rest — targeting, placements, groups, restructuring rules, naming templates, automation — is already in place from the previous build.
Open the Facebook Campaign Launcher, go to the campaign level, open the **My Space** tab, and click **Apply Template** next to the template you want to use.
Update creatives, budget, URL, or any other setting that differs from the previous launch.
If your changes represent a new reusable configuration (e.g., a different product or market), use **Save As** to save it as a new template before publishing.
Proceed through Review Variations and Add Automation & Publish as normal.
Most media buying teams repeat similar campaign structures daily. Save your first build as a template and every subsequent launch becomes a matter of minutes — even for complex multi-variation, multi-account structures.
 ***
## Applying a Saved Template
The next time you open the Facebook Campaign Launcher, go to the campaign level and open the **My Space** tab on the right panel. Your saved templates are listed there, each showing a summary of what the template will create:
* **Number of Campaigns** — how many campaigns will be generated
* **Campaign Daily Budget** — the total daily budget across campaigns
* **Number of Ad Sets** — total ad sets that will be created
* **Ad Set Variations** — number of ad set variations
Click **Apply Template** next to any template to instantly load the entire structure — campaign settings, ad set configuration, ad setup, groups, Restructuring rules, and automation assignments. The **Variation Preview** panel on the right also updates immediately to reflect the template's totals, so you can confirm you are loading the right structure before making any changes.
***
## Making Changes After Loading
Once a template is loaded, everything is fully editable. Typically you only need to:
* Swap in new creatives at the ad level
* Adjust a budget amount
* Update a destination URL or pixel
* Change the ad account (for multi-account launches)
The rest — targeting, placements, groups, restructuring rules, naming templates, automation — is already in place from the previous build.
***
## Applying a Saved Template
The next time you open the Facebook Campaign Launcher, go to the campaign level and open the **My Space** tab on the right panel. Your saved templates are listed there, each showing a summary of what the template will create:
* **Number of Campaigns** — how many campaigns will be generated
* **Campaign Daily Budget** — the total daily budget across campaigns
* **Number of Ad Sets** — total ad sets that will be created
* **Ad Set Variations** — number of ad set variations
Click **Apply Template** next to any template to instantly load the entire structure — campaign settings, ad set configuration, ad setup, groups, Restructuring rules, and automation assignments. The **Variation Preview** panel on the right also updates immediately to reflect the template's totals, so you can confirm you are loading the right structure before making any changes.
***
## Making Changes After Loading
Once a template is loaded, everything is fully editable. Typically you only need to:
* Swap in new creatives at the ad level
* Adjust a budget amount
* Update a destination URL or pixel
* Change the ad account (for multi-account launches)
The rest — targeting, placements, groups, restructuring rules, naming templates, automation — is already in place from the previous build.