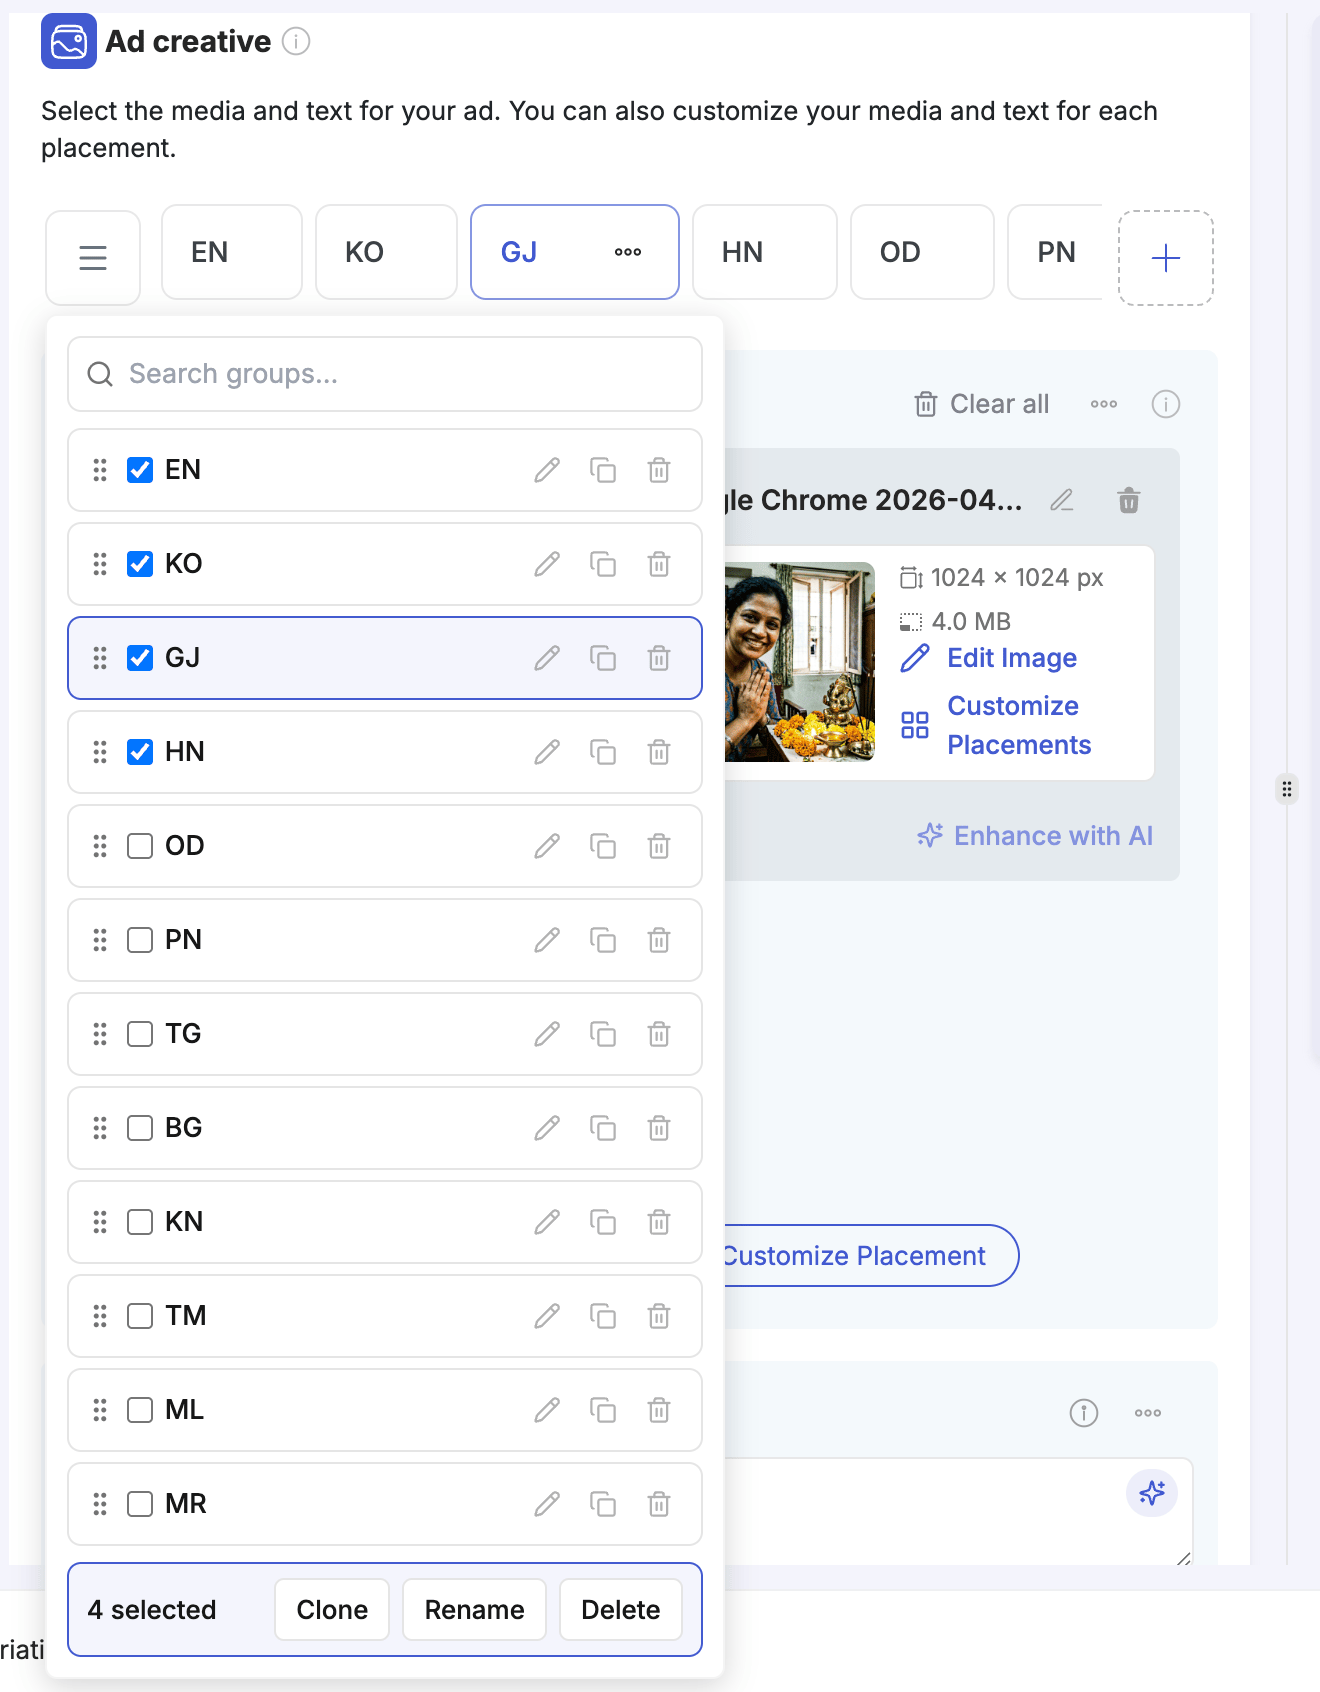
 **Where groups are available:**
| Level | Section | Group name in UI | What varies between groups |
| ------------ | ----------------- | ---------------- | --------------------------------------------------------------------- |
| **Campaign** | Budget | Budget Group | Daily budget amount, bid strategy |
| **Ad Set** | Budget & Schedule | Budget Group | Per-ad-set daily/lifetime budget, schedule |
| **Ad Set** | Audience Controls | Audience Group | Locations (include/exclude), age, gender, languages, custom audiences |
| **Ad Set** | Placements | Placement Group | Advantage+ vs manual placements, platform/position selections |
| **Ad** | Identity | Identity Group | Facebook Page, Instagram Account |
| **Ad** | Ad Creative | Creative Group | Media (images/videos), primary text, headlines, descriptions |
**How permutations are calculated.** Groups at the same level multiply with each other. If you create three budget groups and three audience groups at the ad set level, the system generates 3 × 3 = 9 ad set variations. Add two placement groups and you get 3 × 3 × 2 = 18 ad set variations.
The **Variation Preview** panel on the right updates in real time as you add groups. Always check this counter before proceeding.
**Where groups are available:**
| Level | Section | Group name in UI | What varies between groups |
| ------------ | ----------------- | ---------------- | --------------------------------------------------------------------- |
| **Campaign** | Budget | Budget Group | Daily budget amount, bid strategy |
| **Ad Set** | Budget & Schedule | Budget Group | Per-ad-set daily/lifetime budget, schedule |
| **Ad Set** | Audience Controls | Audience Group | Locations (include/exclude), age, gender, languages, custom audiences |
| **Ad Set** | Placements | Placement Group | Advantage+ vs manual placements, platform/position selections |
| **Ad** | Identity | Identity Group | Facebook Page, Instagram Account |
| **Ad** | Ad Creative | Creative Group | Media (images/videos), primary text, headlines, descriptions |
**How permutations are calculated.** Groups at the same level multiply with each other. If you create three budget groups and three audience groups at the ad set level, the system generates 3 × 3 = 9 ad set variations. Add two placement groups and you get 3 × 3 × 2 = 18 ad set variations.
The **Variation Preview** panel on the right updates in real time as you add groups. Always check this counter before proceeding.
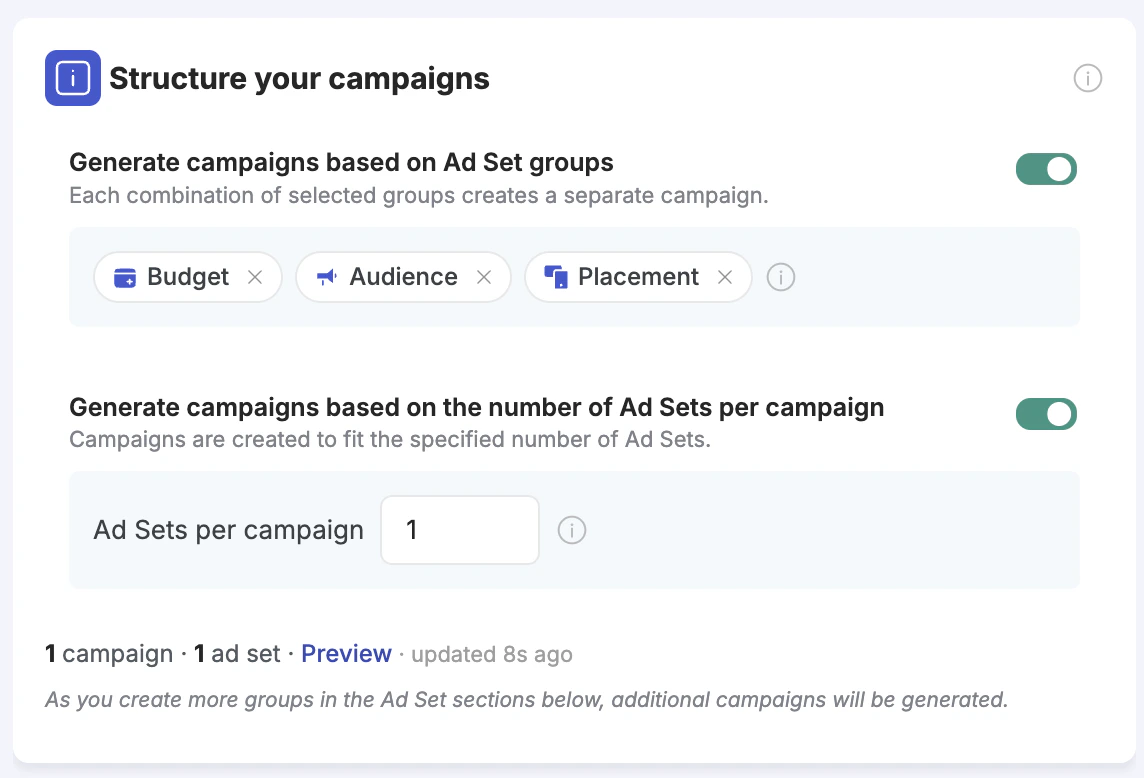 There are two options, each independently toggleable. You can enable one, the other, or both simultaneously.
**Option 1 — Generate campaigns based on Ad Set groups**
This option lets you specify which ad set groups each generate a separate campaign. For example, if you have defined Audience groups and Placement groups at the ad set level, you can tell the system: "Give each unique combination of audience and placement its own campaign."
Selecting a group here moves that dimension of variation from the ad set level up to the campaign level. The result: each campaign contains ad sets that share the same audience/placement combination, and different campaigns are used to isolate different targeting setups.
Multiple groups can be combined. The number of campaigns created equals the number of unique combinations across all selected groups. For example:
* 5 Audience groups × 3 Placement groups = **15 campaigns**, each containing ad sets for one specific audience + placement pair
* Any other groups you defined but did not include here (e.g., Budget groups) remain as ad set-level variation inside each campaign
This option did not exist in the previous version of the launcher. Previously, you could only separate campaigns by the number of ad sets — you had no way to say "I want a separate campaign for each audience I'm testing."
There are two options, each independently toggleable. You can enable one, the other, or both simultaneously.
**Option 1 — Generate campaigns based on Ad Set groups**
This option lets you specify which ad set groups each generate a separate campaign. For example, if you have defined Audience groups and Placement groups at the ad set level, you can tell the system: "Give each unique combination of audience and placement its own campaign."
Selecting a group here moves that dimension of variation from the ad set level up to the campaign level. The result: each campaign contains ad sets that share the same audience/placement combination, and different campaigns are used to isolate different targeting setups.
Multiple groups can be combined. The number of campaigns created equals the number of unique combinations across all selected groups. For example:
* 5 Audience groups × 3 Placement groups = **15 campaigns**, each containing ad sets for one specific audience + placement pair
* Any other groups you defined but did not include here (e.g., Budget groups) remain as ad set-level variation inside each campaign
This option did not exist in the previous version of the launcher. Previously, you could only separate campaigns by the number of ad sets — you had no way to say "I want a separate campaign for each audience I'm testing."
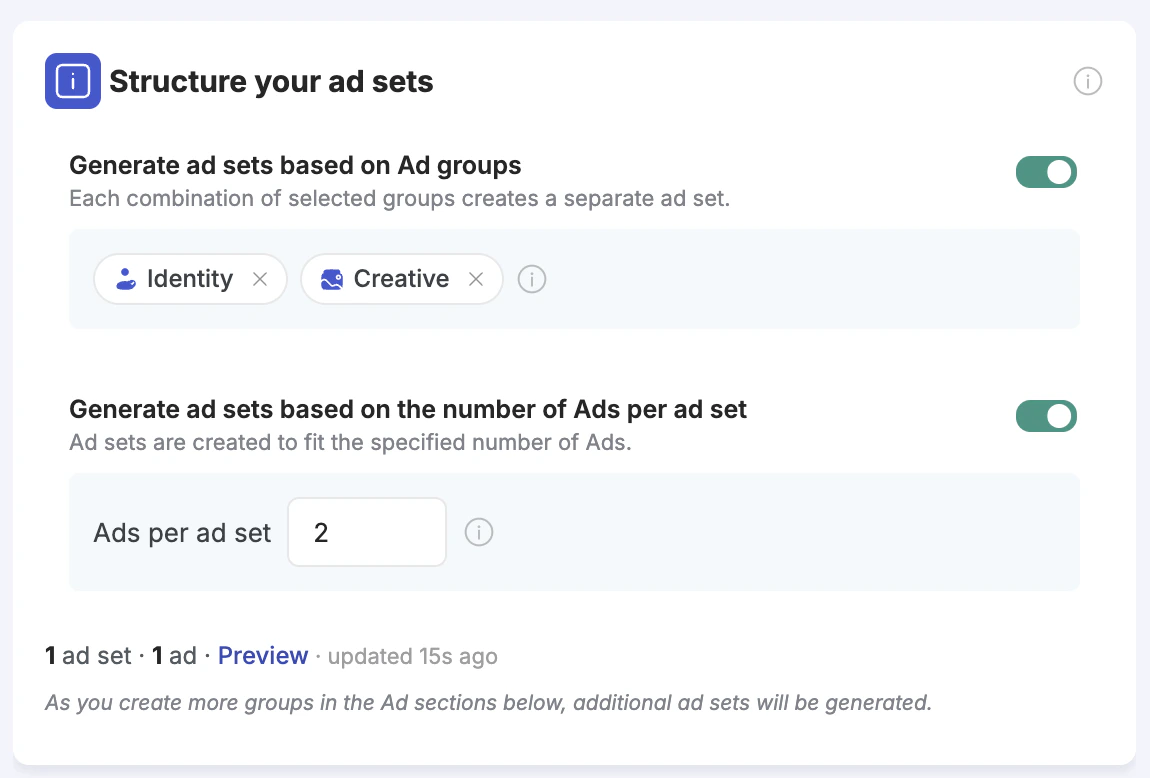 It has the same two-option layout as the campaign-level section, and also has a **Preview** button.
**Option 1 — Generate ad sets based on Ad groups**
This option lets you specify which ad-level groups each generate a separate ad set. For example:
* Select **Identity group** → each Facebook Page / Instagram Account combination gets its own ad set
* Select **Creative group** → each creative group (images, videos, copy variations) gets its own ad set
* Select both → each combination of identity and creative gets its own ad set
This is particularly useful for:
* **Testing images vs. videos in separate ad sets** — create one Creative group with images and one with videos, select it here, and each gets its own ad set
* **Running ads under different Pages in separate ad sets** — identity isolation per ad set without manual duplication
* **Testing different copy groups on separate ad sets** — group ads by copy variation and isolate each group
This option did not exist previously. In the old version, groups were only used at the ad level to generate ad variations — there was no way to say "I want a separate ad set for each creative group." Now you can.
**Option 2 — Generate ad sets based on the number of Ads per ad set**
Toggle this on and set the number of ads per ad set. The system generates the necessary number of ad sets to accommodate all your ads at that count.
Example: you have uploaded 30 images (30 ads). Setting this to "5 Ads per Ad Set" creates 6 ad sets, each containing 5 ads. Setting it to "1 Ad per Ad Set" creates 30 ad sets.
**How ad set restructuring affects campaign restructuring**
The total number of ad sets generated by the ad set-level restructuring feeds directly into the campaign-level restructuring calculation. If the ad set structure produces 30 ad sets and you have "1 Ad Set per campaign" enabled at the campaign level, you will end up with 30 campaigns — regardless of how many you started with.
Always use the **Preview** button after configuring both sections to see the final campaign count and structure.
***
### Manage Combinations
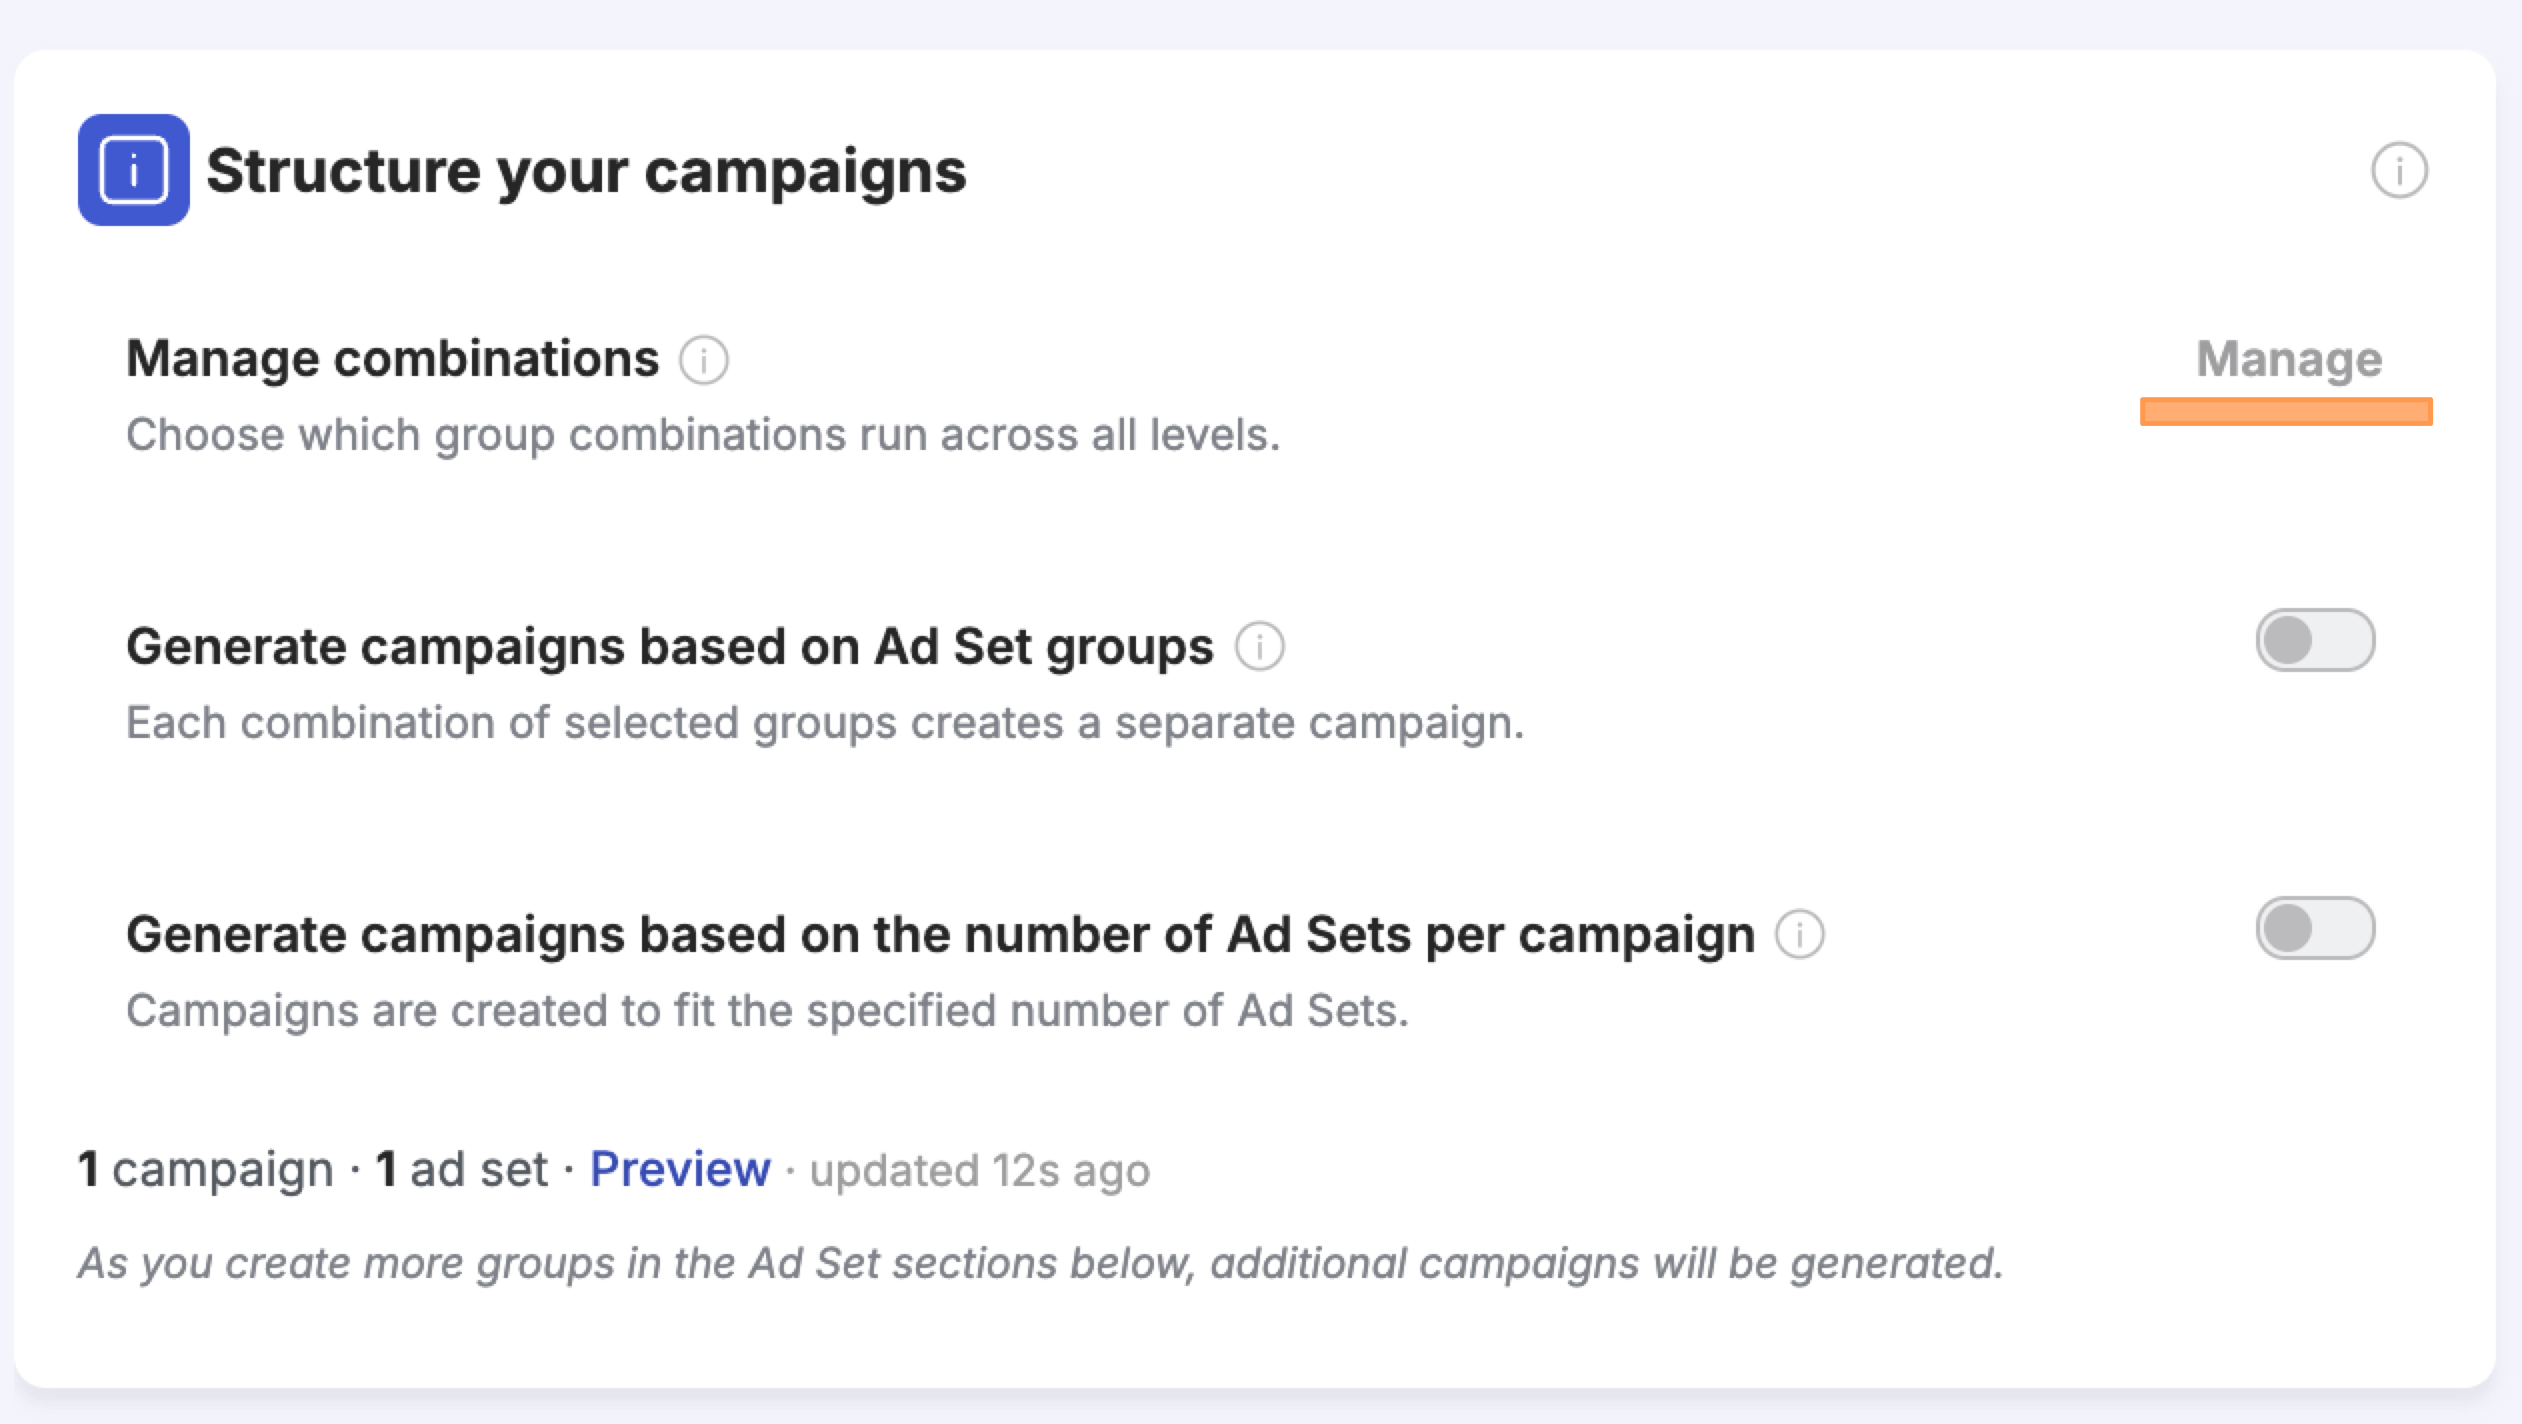
By default, when you define multiple groups across levels, the system generates every possible combination of those groups. **Manage Combinations** gives you precise control over which specific combinations actually get created — letting you remove nonsensical pairings without deleting any groups.
The **Manage combinations** option appears at the top of both the **Structure your campaigns** and **Structure your ad sets** sections — above the two generate/restructure toggles. Click the **Manage** button to open the combinations manager.
It has the same two-option layout as the campaign-level section, and also has a **Preview** button.
**Option 1 — Generate ad sets based on Ad groups**
This option lets you specify which ad-level groups each generate a separate ad set. For example:
* Select **Identity group** → each Facebook Page / Instagram Account combination gets its own ad set
* Select **Creative group** → each creative group (images, videos, copy variations) gets its own ad set
* Select both → each combination of identity and creative gets its own ad set
This is particularly useful for:
* **Testing images vs. videos in separate ad sets** — create one Creative group with images and one with videos, select it here, and each gets its own ad set
* **Running ads under different Pages in separate ad sets** — identity isolation per ad set without manual duplication
* **Testing different copy groups on separate ad sets** — group ads by copy variation and isolate each group
This option did not exist previously. In the old version, groups were only used at the ad level to generate ad variations — there was no way to say "I want a separate ad set for each creative group." Now you can.
**Option 2 — Generate ad sets based on the number of Ads per ad set**
Toggle this on and set the number of ads per ad set. The system generates the necessary number of ad sets to accommodate all your ads at that count.
Example: you have uploaded 30 images (30 ads). Setting this to "5 Ads per Ad Set" creates 6 ad sets, each containing 5 ads. Setting it to "1 Ad per Ad Set" creates 30 ad sets.
**How ad set restructuring affects campaign restructuring**
The total number of ad sets generated by the ad set-level restructuring feeds directly into the campaign-level restructuring calculation. If the ad set structure produces 30 ad sets and you have "1 Ad Set per campaign" enabled at the campaign level, you will end up with 30 campaigns — regardless of how many you started with.
Always use the **Preview** button after configuring both sections to see the final campaign count and structure.
***
### Manage Combinations
By default, when you define multiple groups across levels, the system generates every possible combination of those groups. **Manage Combinations** gives you precise control over which specific combinations actually get created — letting you remove nonsensical pairings without deleting any groups.
The **Manage combinations** option appears at the top of both the **Structure your campaigns** and **Structure your ad sets** sections — above the two generate/restructure toggles. Click the **Manage** button to open the combinations manager.
 #### The Manage Combinations Dialog
The dialog lists every possible combination of your current groups. Each row shows the groups involved (e.g., CREATIVE **EN** + DESTINATION **EN-LP01**) and a toggle to include or exclude that combination.
#### The Manage Combinations Dialog
The dialog lists every possible combination of your current groups. Each row shows the groups involved (e.g., CREATIVE **EN** + DESTINATION **EN-LP01**) and a toggle to include or exclude that combination.
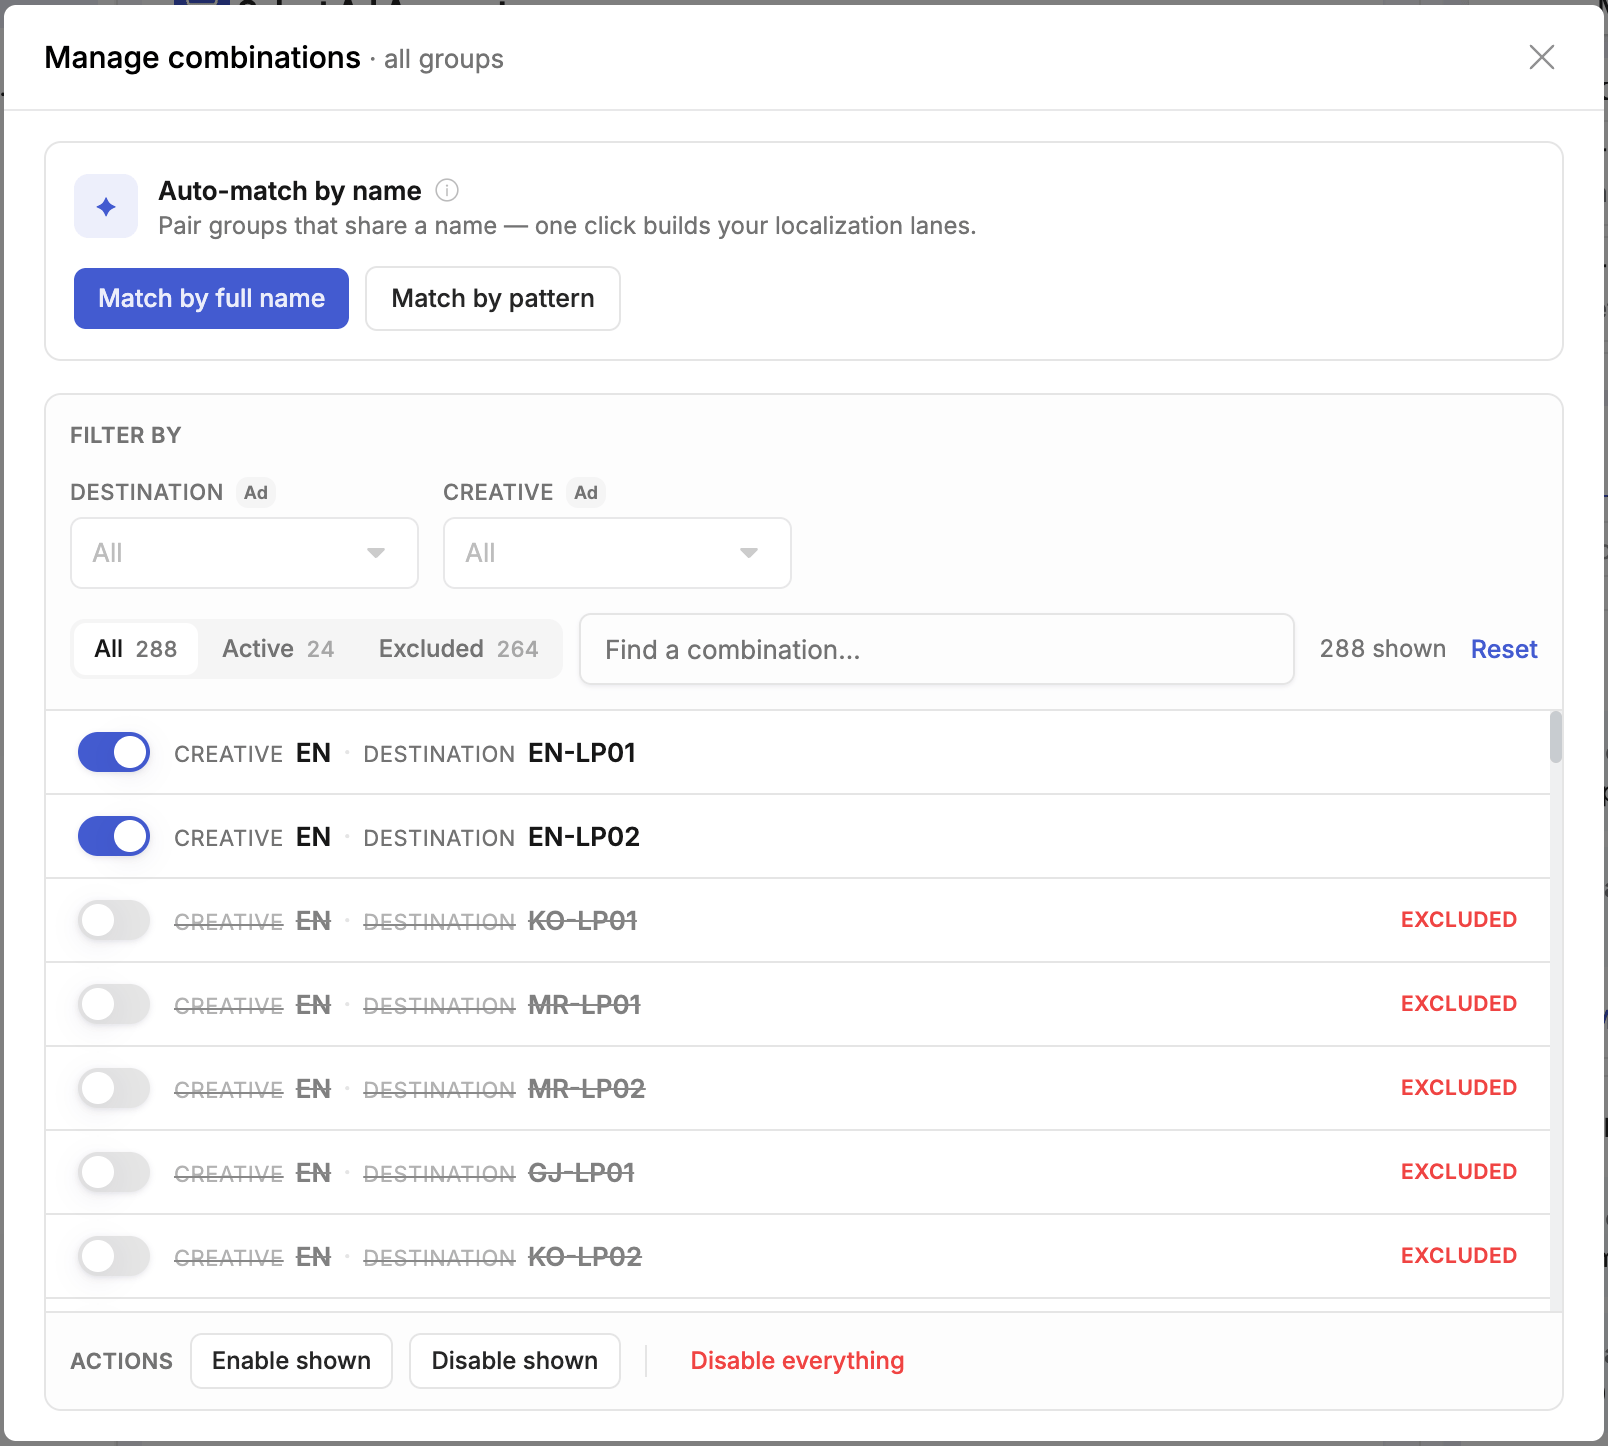 At the top of the dialog, a counter shows how many combinations are **Active** vs. **Excluded** in total. A search field lets you find a specific combination by name. Use the **Filter by** dropdowns to narrow the list by group type (e.g., show only combinations involving a specific Destination or Creative group).
At the bottom, three bulk action buttons let you act on the filtered list:
* **Enable shown** — activate all combinations currently visible in the filtered list
* **Disable shown** — exclude all combinations currently visible
* **Disable everything** — exclude every combination at once (useful for starting from zero and enabling only what you want)
#### Auto-Match by Name
Instead of toggling combinations manually, use **Auto-match by name** to automatically pair groups that share a name across levels. This is the fastest way to set up localisation-style structures where each creative group should only run with the matching destination group.
**Match by full name** — pairs groups whose names are identical. For example, a Creative group named "EN" is automatically enabled only with Destination groups also named "EN", while all cross-language pairings are excluded.
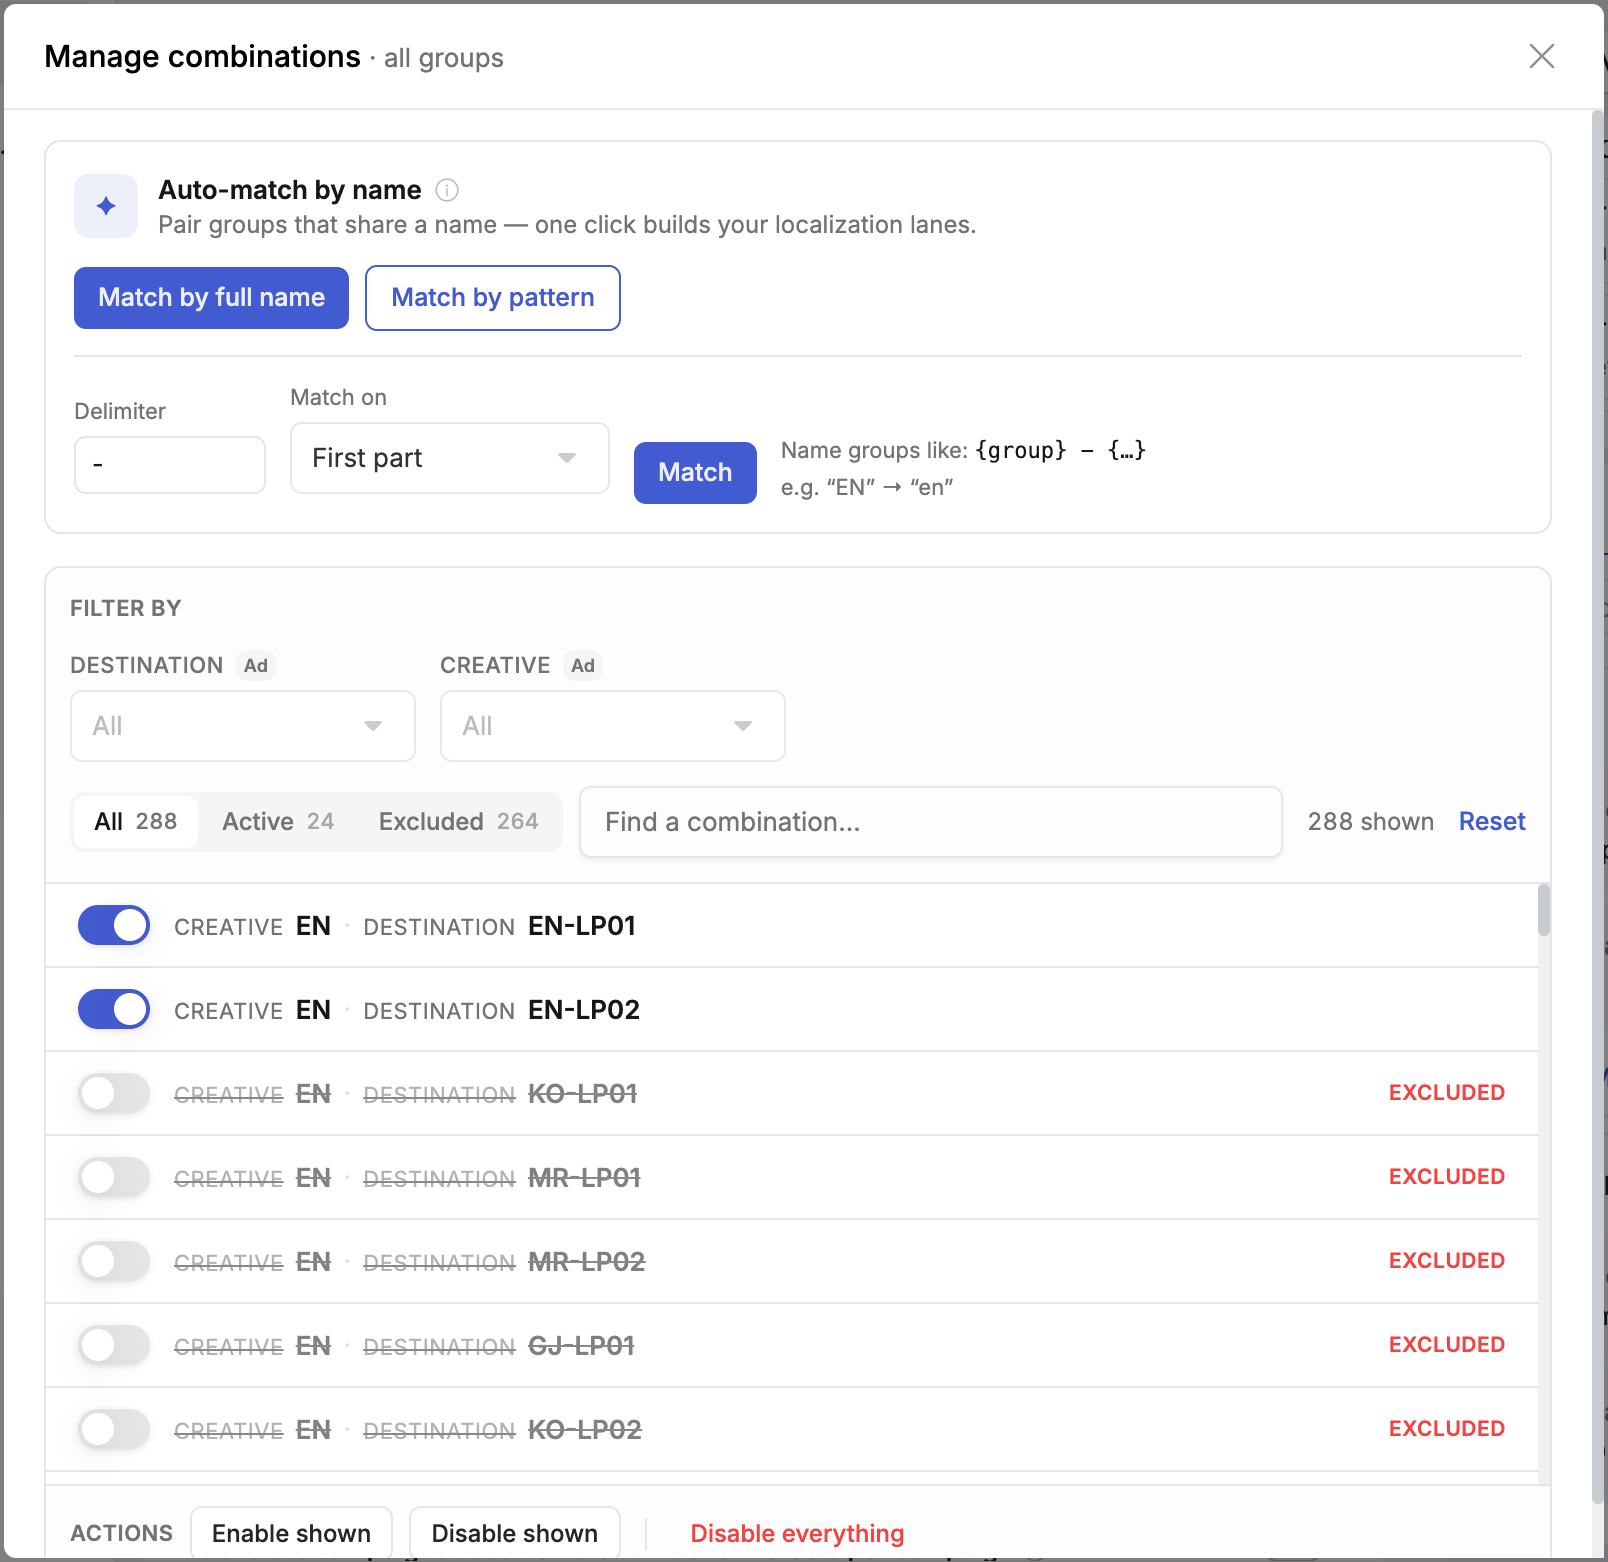
**Match by pattern** — pairs groups that share a common prefix when you split the name by a delimiter. Set the delimiter (e.g., `-`) and the part to match on (e.g., "First part"), then click **Match**. For example, with delimiter `-` and match on "First part": a Creative group named "EN" matches Destination groups named "EN-LP01" and "EN-LP02" (both start with "EN-"), while "KO-LP01" and "MR-LP01" are excluded.
At the top of the dialog, a counter shows how many combinations are **Active** vs. **Excluded** in total. A search field lets you find a specific combination by name. Use the **Filter by** dropdowns to narrow the list by group type (e.g., show only combinations involving a specific Destination or Creative group).
At the bottom, three bulk action buttons let you act on the filtered list:
* **Enable shown** — activate all combinations currently visible in the filtered list
* **Disable shown** — exclude all combinations currently visible
* **Disable everything** — exclude every combination at once (useful for starting from zero and enabling only what you want)
#### Auto-Match by Name
Instead of toggling combinations manually, use **Auto-match by name** to automatically pair groups that share a name across levels. This is the fastest way to set up localisation-style structures where each creative group should only run with the matching destination group.
**Match by full name** — pairs groups whose names are identical. For example, a Creative group named "EN" is automatically enabled only with Destination groups also named "EN", while all cross-language pairings are excluded.
**Match by pattern** — pairs groups that share a common prefix when you split the name by a delimiter. Set the delimiter (e.g., `-`) and the part to match on (e.g., "First part"), then click **Match**. For example, with delimiter `-` and match on "First part": a Creative group named "EN" matches Destination groups named "EN-LP01" and "EN-LP02" (both start with "EN-"), while "KO-LP01" and "MR-LP01" are excluded.
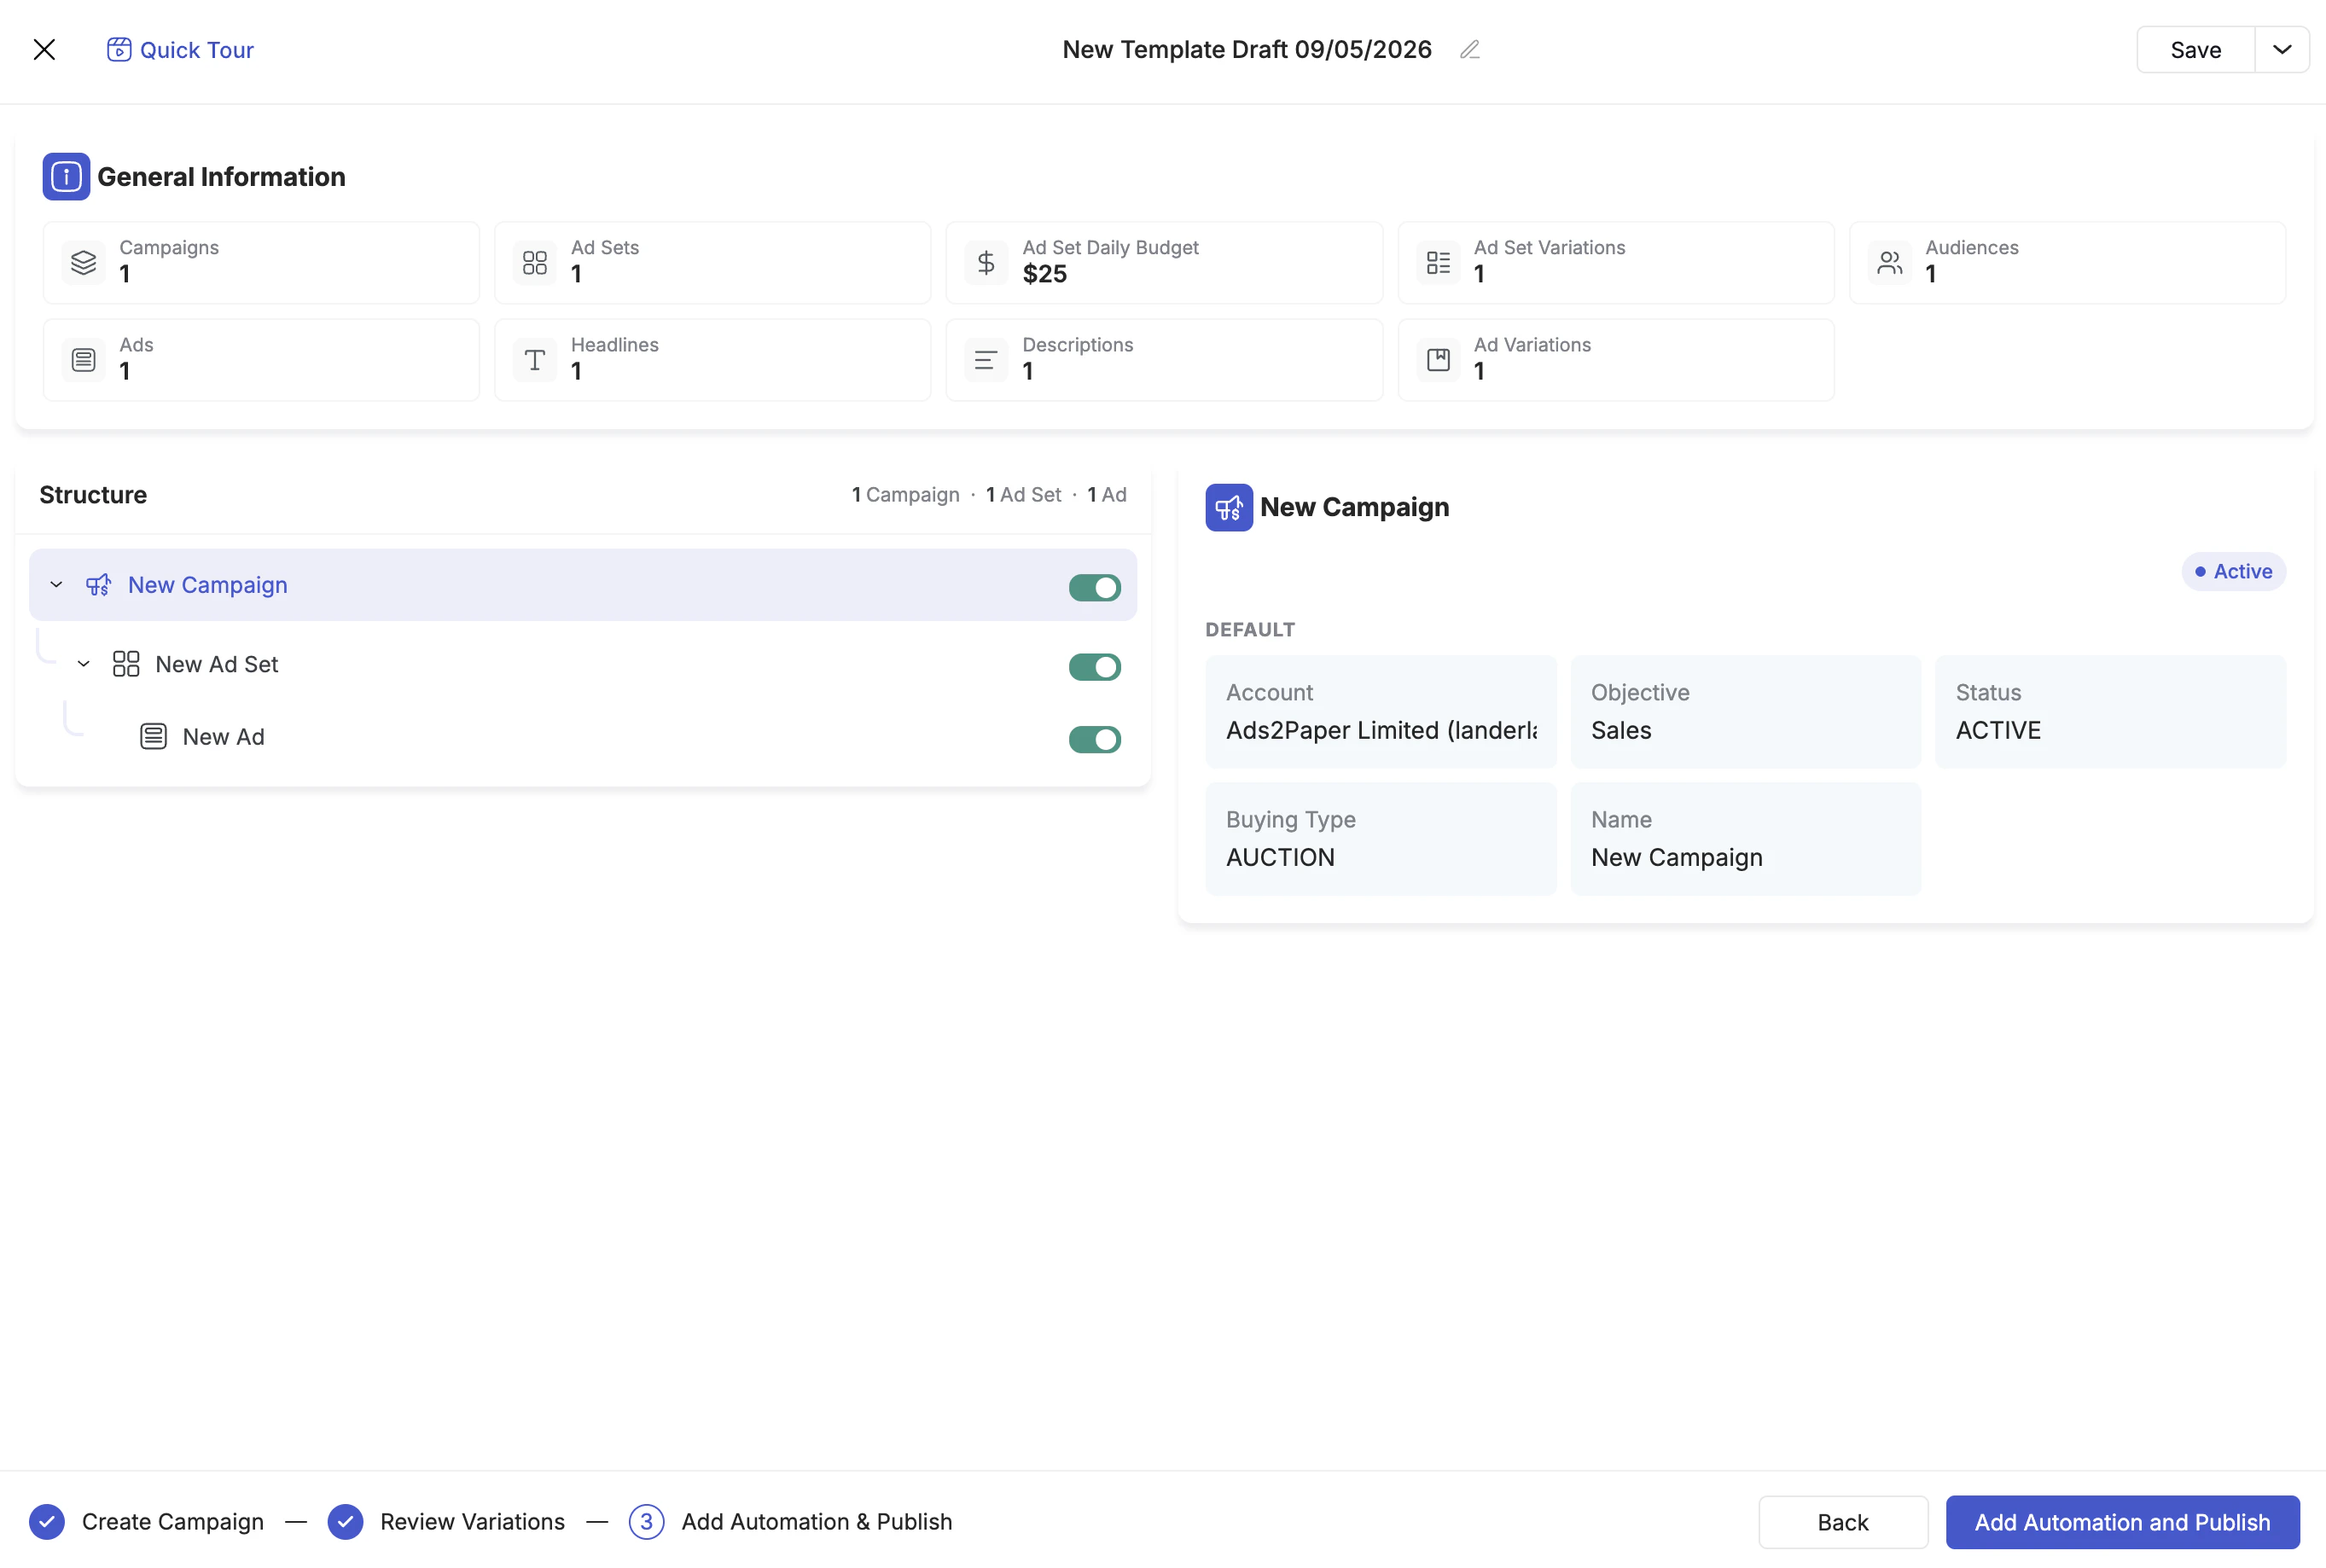 The Review Variations step is now purely a review screen. Restructuring is no longer done here — it was moved to Step 1 in the latest version of the launcher.
**What you see in Step 2:**
At the top, a row of summary cards shows:
* Number of Campaigns
* Number of Ad Sets
* Total Daily Budget (for ad set-level budgets)
* Number of Ad Set Variations
* Number of Audiences
* Number of Ads
* Number of Headlines
* Number of Descriptions
* Number of Ad Variations
Below the summary cards is the full campaign tree — Campaign → Ad Set → Ad — with each item showing its final name (naming templates applied). Every item in the tree has a **toggle switch** you can use to enable or disable that specific variation. Disabling a campaign disables everything inside it; disabling an individual ad set or ad removes just that item from the launch.
This is where you make any final adjustments — for example, removing a specific ad from one ad set, or disabling a campaign variation you no longer want — without going back and re-configuring the whole structure.
***
## Using Duplication
The third way to generate variations is by manually duplicating items in the left panel tree. Click the three-dot menu (⋯) on any campaign, ad set, or ad and select **Duplicate** (to copy with all settings) or **Create New** (to start a fresh one).
Duplication creates an exact copy of the selected item and everything inside it. You can then click on the copy and modify its settings — different creatives, different destination URLs, different structure.
This is the most manual approach, but it gives you full control over exactly what goes inside each campaign, ad set, or ad.
***
## Groups vs. Restructuring vs. Duplication — When to Use Which
| Method | Best for | Control level |
| ----------------- | ------------------------------------------------------------------------------------------------------------------------ | ---------------------------------------------------------------- |
| **Groups** | Testing combinations of variables (budgets × audiences × placements) — you want all permutations generated automatically | You control the variables; the system generates all combinations |
| **Restructuring** | Deciding how ad sets and ads are distributed across campaigns — audience isolation, creative isolation, budget isolation | You control the distribution rule; the system does the splitting |
| **Duplication** | When you need specific creatives in specific ad sets, or different destination URLs per ad — full manual control | You control everything; no automation |
In practice, most workflows use a combination: Groups define what varies, Restructuring decides how variations are distributed across campaigns and ad sets, and Duplication handles the parts that need manual precision.
***
## Next Steps
* [Multi-Ad Account Launch](/ad-networks/facebook/campaign-uploader/multi-account) — launch the same structure across multiple ad accounts simultaneously
* [Dynamic Naming Templates](/ad-networks/facebook/campaign-uploader/naming-templates) — auto-generate meaningful names across all your variations
The Review Variations step is now purely a review screen. Restructuring is no longer done here — it was moved to Step 1 in the latest version of the launcher.
**What you see in Step 2:**
At the top, a row of summary cards shows:
* Number of Campaigns
* Number of Ad Sets
* Total Daily Budget (for ad set-level budgets)
* Number of Ad Set Variations
* Number of Audiences
* Number of Ads
* Number of Headlines
* Number of Descriptions
* Number of Ad Variations
Below the summary cards is the full campaign tree — Campaign → Ad Set → Ad — with each item showing its final name (naming templates applied). Every item in the tree has a **toggle switch** you can use to enable or disable that specific variation. Disabling a campaign disables everything inside it; disabling an individual ad set or ad removes just that item from the launch.
This is where you make any final adjustments — for example, removing a specific ad from one ad set, or disabling a campaign variation you no longer want — without going back and re-configuring the whole structure.
***
## Using Duplication
The third way to generate variations is by manually duplicating items in the left panel tree. Click the three-dot menu (⋯) on any campaign, ad set, or ad and select **Duplicate** (to copy with all settings) or **Create New** (to start a fresh one).
Duplication creates an exact copy of the selected item and everything inside it. You can then click on the copy and modify its settings — different creatives, different destination URLs, different structure.
This is the most manual approach, but it gives you full control over exactly what goes inside each campaign, ad set, or ad.
***
## Groups vs. Restructuring vs. Duplication — When to Use Which
| Method | Best for | Control level |
| ----------------- | ------------------------------------------------------------------------------------------------------------------------ | ---------------------------------------------------------------- |
| **Groups** | Testing combinations of variables (budgets × audiences × placements) — you want all permutations generated automatically | You control the variables; the system generates all combinations |
| **Restructuring** | Deciding how ad sets and ads are distributed across campaigns — audience isolation, creative isolation, budget isolation | You control the distribution rule; the system does the splitting |
| **Duplication** | When you need specific creatives in specific ad sets, or different destination URLs per ad — full manual control | You control everything; no automation |
In practice, most workflows use a combination: Groups define what varies, Restructuring decides how variations are distributed across campaigns and ad sets, and Duplication handles the parts that need manual precision.
***
## Next Steps
* [Multi-Ad Account Launch](/ad-networks/facebook/campaign-uploader/multi-account) — launch the same structure across multiple ad accounts simultaneously
* [Dynamic Naming Templates](/ad-networks/facebook/campaign-uploader/naming-templates) — auto-generate meaningful names across all your variations