> ## Documentation Index
> Fetch the complete documentation index at: https://docs.theoptimizer.io/llms.txt
> Use this file to discover all available pages before exploring further.

# Connect AdsBridge

> Connect AdsBridge to TheOptimizer to bring click-level conversion and revenue data into your campaign reports and automation rules.

export const ArcadeVideoButton = ({id, title = "Watch interactive demo", label = "Watch Video"}) => {
  const [open, setOpen] = useState(false);
  return <div style={{
    display: 'inline-block'
  }}>
      <button type="button" onClick={() => setOpen(true)} style={{
    display: 'inline-flex',
    alignItems: 'center',
    gap: '8px',
    backgroundColor: '#3e47ec',
    color: '#ffffff',
    border: 'none',
    padding: '10px 18px',
    borderRadius: '8px',
    fontSize: '15px',
    fontWeight: '600',
    cursor: 'pointer'
  }}>
        <svg xmlns="http://www.w3.org/2000/svg" width="16" height="16" viewBox="0 0 24 24" fill="white">
          <polygon points="5,3 19,12 5,21" />
        </svg>
        {label}
      </button>

      {open && <div onClick={() => setOpen(false)} style={{
    position: 'fixed',
    top: 0,
    left: 0,
    width: '100%',
    height: '100%',
    backgroundColor: 'rgba(0, 0, 0, 0.85)',
    zIndex: 9999999,
    display: 'flex',
    alignItems: 'center',
    justifyContent: 'center'
  }}>
          <div onClick={e => e.stopPropagation()} style={{
    width: '90%',
    maxWidth: '1100px',
    aspectRatio: '16 / 9',
    borderRadius: '12px',
    overflow: 'hidden',
    position: 'relative'
  }}>
            <iframe src={`https://demo.arcade.software/${id}?embed&embed_mobile=tab&embed_desktop=inline&show_copy_link=true`} title={title} frameBorder="0" loading="lazy" allowFullScreen allow="clipboard-write" style={{
    width: '100%',
    height: '100%',
    border: 'none',
    colorScheme: 'light'
  }} />
          </div>

          <button type="button" onClick={() => setOpen(false)} style={{
    position: 'fixed',
    top: '20px',
    right: '24px',
    background: 'rgba(255,255,255,0.15)',
    border: 'none',
    color: '#ffffff',
    fontSize: '24px',
    lineHeight: 1,
    width: '40px',
    height: '40px',
    borderRadius: '50%',
    cursor: 'pointer',
    display: 'flex',
    alignItems: 'center',
    justifyContent: 'center'
  }}>
            ✕
          </button>
        </div>}
    </div>;
};

export const ArcadePopoutModal = ({id, title = "Interactive demo"}) => {
  const [isPopout, setIsPopout] = useState(false);
  const iframeRef = useRef(null);
  useEffect(() => {
    function onArcadeIframeMessage(e) {
      if (e.origin !== 'https://demo.arcade.software' || !e.isTrusted) return;
      if (!iframeRef.current || !iframeRef.current.contentWindow) return;
      if (e.data.event === 'arcade-init') {
        iframeRef.current.contentWindow.postMessage({
          event: 'register-popout-handler'
        }, '*');
      }
      if (e.data.event === 'arcade-popout-open') {
        setIsPopout(true);
      }
      if (e.data.event === 'arcade-popout-close') {
        setIsPopout(false);
      }
    }
    window.addEventListener('message', onArcadeIframeMessage);
    return () => window.removeEventListener('message', onArcadeIframeMessage);
  }, []);
  return <div style={{
    position: 'relative',
    paddingBottom: 'calc(54.4737% + 41px)',
    height: 0,
    width: '100%'
  }}>
      <iframe ref={iframeRef} src={`https://demo.arcade.software/${id}?embed&embed_mobile=tab&embed_desktop=modal&show_copy_link=true`} title={title} frameBorder="0" loading="lazy" allowFullScreen allow="clipboard-write" style={{
    position: isPopout ? 'fixed' : 'absolute',
    top: 0,
    left: 0,
    width: '100%',
    height: '100%',
    zIndex: isPopout ? 9999999 : 'auto',
    colorScheme: 'light'
  }} />
    </div>;
};

AdsBridge is a cloud-based tracking platform designed for affiliate marketers and media buyers. It provides click-level tracking, landing page hosting, traffic distribution, and real-time reporting — all from a hosted environment that requires no server management. AdsBridge is popular with teams that want an all-in-one solution combining tracking and landing page functionality.

***

## Where to Find Your API Credentials

Log in to AdsBridge → go to **Profile** → **API Settings** → copy your **Account ID** and **API Key**.

***

## Connecting to TheOptimizer

<Steps>
  <Step title="Open Integrations">
    From the left-hand menu, go to **Integrations**. Scroll to the **Tracking Platforms** section, find the AdsBridge card and click **Connect →**.
  </Step>

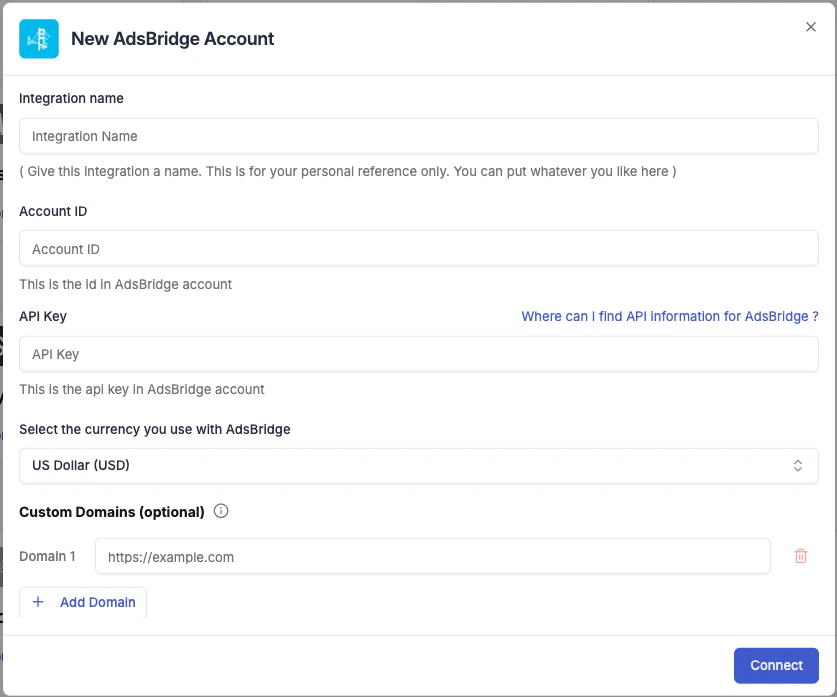
  <Step title="Enter Your API Credentials">
    Fill in the connection form:

    * **Integration name** — a label for this connection (e.g. "AdsBridge – Brand A").
    * **Account ID** — paste the Account ID from your AdsBridge profile.
    * **API Key** — paste the API Key from your AdsBridge profile.
    * **Currency** — the currency your tracker reports revenue in. Must match your tracker's settings.
    * **Conversion registration time** — choose **Visit time** (conversion counted when user lands) or **Postback time** (counted when conversion fires). Match this to your tracker's setup.
    * **Custom Domains** *(optional)* — if you use custom tracking domains in AdsBridge, add them here using the **+ Add Domain** button. This ensures TheOptimizer can correctly attribute data from those domains.

    <Frame>
      <img src="https://mintcdn.com/theoptimizer/YyOZJpa0RkIUYLFP/images/adsbridge.png?fit=max&auto=format&n=YyOZJpa0RkIUYLFP&q=85&s=e60d1b4bb32dce29538859960bf56832" alt="AdsBridge connection form in TheOptimizer" width="837" height="697" data-path="images/adsbridge.png" />
    </Frame>

    <Warning>
      The Currency and Conversion Registration Time settings must match what you have configured in AdsBridge. Mismatched settings will cause data discrepancies.
    </Warning>
  </Step>

  <Step title="Configure for Your Ad Networks">
    After saving the credentials, TheOptimizer prompts you to configure the tracker for each connected ad network. This step tells the platform how to match AdsBridge data to your campaigns.

    Click **Configure →** next to each ad network and select the **tracking template** that matches how you set up AdsBridge for that network.

    **Understanding tracking templates**

    A tracking template is a set of macros that maps your tracker's URL parameters to ad network identifiers (Campaign ID, Ad Set ID, Ad ID, Placement). The dropdown shows all templates available from your AdsBridge account. Select the one you use for that ad network.

    <Warning>
      Required macros: a template must include mappings for **Campaign ID**, **Ad Set ID**, **Ad ID**, and **Placement**. If any are missing, TheOptimizer will flag the issue — fix the template in AdsBridge before proceeding.
    </Warning>

    Once a template is selected, the connection status for that ad network updates to **Connected**.

    <Note>
      Ad networks where you have not selected a tracking template will not receive any data from AdsBridge. Configure every network you actively use.
    </Note>
  </Step>

  <Step title="Add Tracking Parameters to Your Campaigns">
    TheOptimizer generates a **tracking parameters code** at the end of setup. Add this URL parameter string to your campaigns on each ad network. This is what allows AdsBridge to receive the correct campaign and ad identifiers and report them back.

    Without this step, AdsBridge will receive visits but won't be able to match them to specific campaigns — no conversion or revenue data will appear in TheOptimizer.
  </Step>
</Steps>

***

## One Tracker Type Per Campaign

Only one instance of a tracker type should track any individual campaign at a time. Running two AdsBridge integrations against the same campaign causes attribution conflicts.

Running **different tracker types** side by side on the same campaign is fine — for example, AdsBridge for affiliate attribution alongside Google Analytics for on-site behaviour.